


How to Choose Sewing Machine Needles That Work
You're halfway through a sampler quilt when the machine's rhythm changes. The needle makes a faint pop, the top thread breaks, and the lighter border print begins to show skipped stitches. You rethread, clean the bobbin case, and adjust tension, but the next seam still looks wrong.
That frustrating moment is often a needle problem, not a tension problem. Learning how to choose sewing machine needles means matching three things: the machine system, the needle point, and the needle size for the fabric and thread. Fabric weight matters, but it's only one part of the decision.
Why the Wrong Needle Wrecks a Good Quilt
A good quilt can start misbehaving when the needle no longer suits the work. On a longarm, the warning may sound like a dull thud as the needle enters a dense section. On a domestic machine, you might hear the needle dragging instead of piercing cleanly, followed by thread nesting beneath the fabric.
Those symptoms tempt you to reach for familiar fixes. Rethreading is sensible, and cleaning the bobbin area is useful, but neither addresses a damaged, unsuitable, or incorrectly sized needle. The needle is the first variable I check, especially after a project moves from light piecing cotton to a thick seam intersection or a layered quilt sandwich.
What the needle point does
Point geometry determines how the needle enters the material. A ballpoint needle pushes between knit loops, while a sharp point cuts through tightly woven fibers. Using a sharp point on a knit can damage the loop structure, while a ballpoint can struggle to form clean stitches in tightly woven quilting cotton. Sailrite's needle-selection guidance recommends selecting the point style for the material rather than relying on fabric weight alone.
A dull tip pulls and distorts fabric instead of entering it cleanly. A needle that's too fine for a dense quilt sandwich can bend or snap, and a needle that's too large can leave unnecessarily large holes. The practical rule is to use the smallest needle that pierces the fabric easily, then test the combination on a scrap.
Practical rule: If a fresh, correctly installed needle fixes the sound and stitch formation, don't change tension first.
The right choice also depends on the thread. A heavier thread needs an eye and groove that let it pass without abrasion. That's why the same 80/12 needle might sew buttery Kona cotton beautifully during piecing yet struggle with a heavier decorative thread, dense batting, or several layered borders.
Needle Anatomy and the Two Numbering Systems
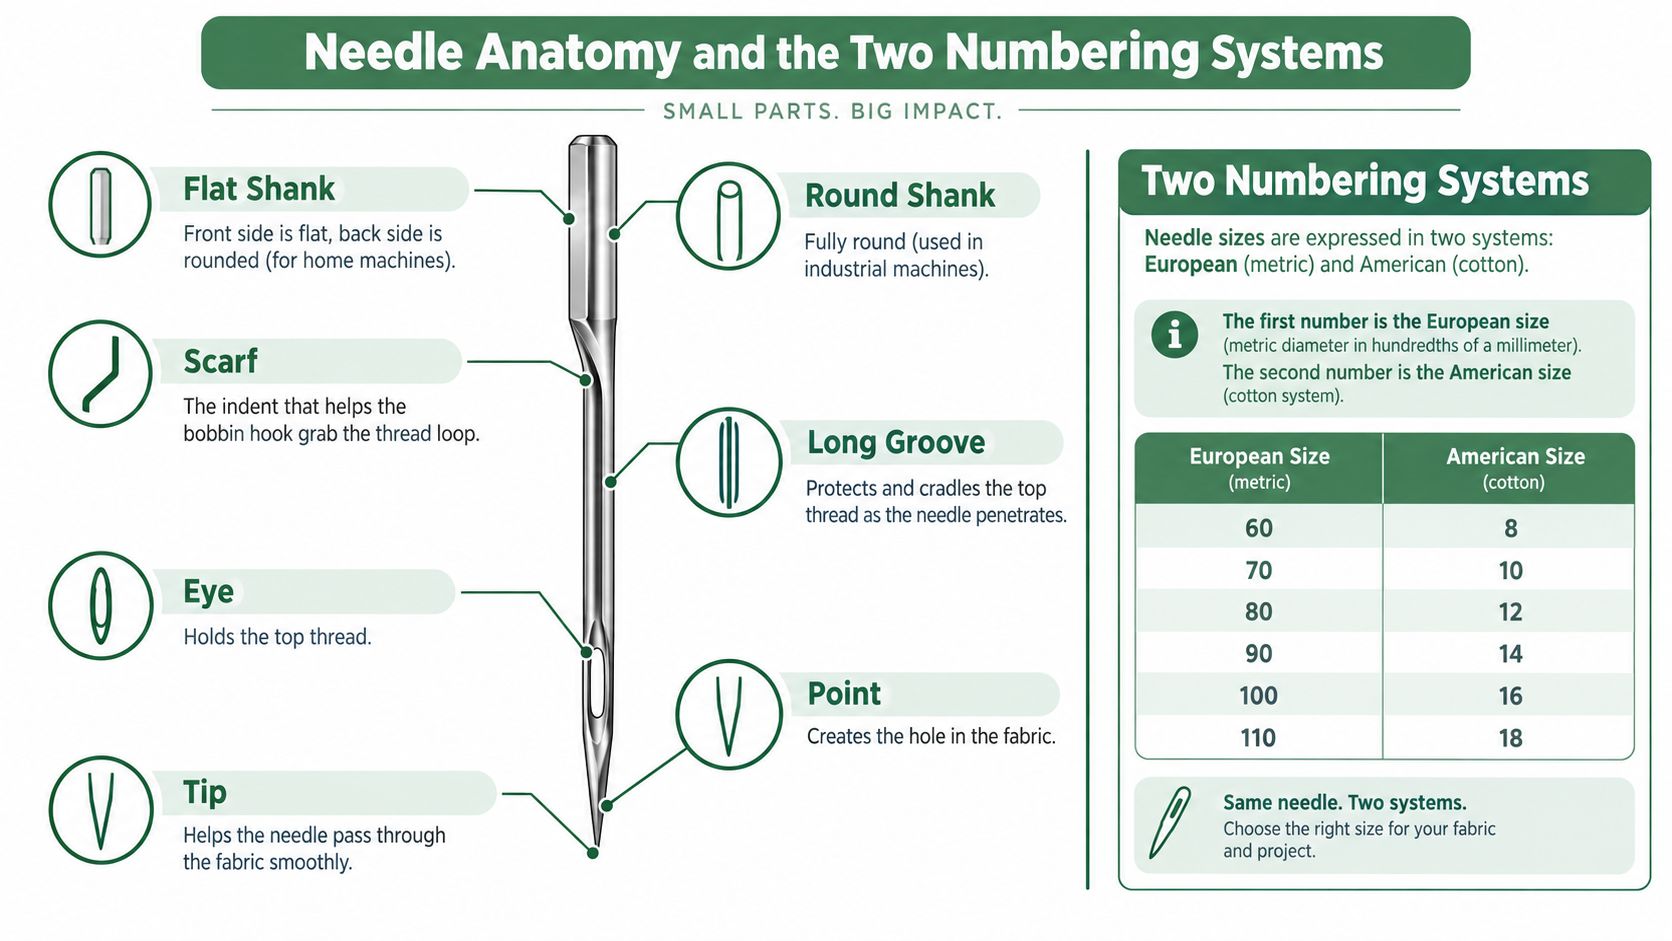
Start at the top of the needle and work downward. A home sewing needle usually has a flat shank, which helps it sit in the correct position in a domestic machine. Round-shank needles are associated with industrial equipment, so your machine manual should always decide which system belongs in the needle clamp.
Below the shank is the scarf, an indentation that gives the bobbin hook room to catch the thread loop. The long groove runs down the front of the needle and protects the upper thread as the needle penetrates the fabric. The eye holds the thread, while the point and tip shape determine how the needle enters a particular material.
The butt is the upper end of the needle. Some manufacturers add colored bands near the butt to help identify type and size, but packaging remains the safest reference because color conventions can vary.
Reading the two numbers
Needles commonly show a European metric number and a U.S. number together. The metric system runs from fine sizes such as 60/8 to larger sizes such as 120/19, with lower numbers indicating finer needles and higher numbers indicating larger needles. SINGER's needle guidance places 70/10 and 80/12 among common choices for lightweight and medium-weight materials.
A useful conversion reference looks like this:
| European metric size | U.S. size |
|---|---|
| 60 | 8 |
| 70 | 10 |
| 80 | 12 |
| 90 | 14 |
| 100 | 16 |
| 110 | 18 |
The first number is the metric designation. In practical sewing terms, 80/12 means one needle size described in both systems, not two separate needles. The 130/705 H system, commonly used by home machines, identifies a flat-shank construction and standardized geometry that improves compatibility between brands. Schmetz explains how to read needle packaging, including the importance of confirming the system before focusing on fabric.
For beginner-friendly supply planning, this guide to quilting supplies for beginners is a useful reminder to keep universal, quilting, sharp, and specialty needles organized rather than loose in one drawer.
Needle Types and the Fabrics They Match
The best needle type follows the fabric's structure. A needle's point can either cut fibers, slide between them, or create a controlled opening, so matching geometry prevents many skipped stitches and damaged surfaces.
| Needle Type | Point Geometry | Best-Fit Fabrics | Made For |
|---|---|---|---|
| Universal | Slightly rounded | Woven cottons and light knits | General sewing and beginner quilting |
| Ballpoint or jersey | Rounded, fiber-separating point | Jersey and knit fabrics | T-shirt quilts and stretch garments |
| Microtex or sharp | Acute, narrow point | Tightly woven cotton, microfiber, silk | Precision piecing and fine fabrics |
| Quilting | Reinforced blade with tapered point | Layered cotton and quilt sandwiches | Piecing and machine quilting |
| Denim | Thick blade with strong tapered point | Denim, canvas, heavy home décor fabric | Utility seams and thick layers |
| Topstitch | Larger eye and deeper groove | Heavier decorative threads and dense fabrics | Visible topstitching |
| Leather | Wedge-shaped cutting point | Leather, vinyl, and faux leather | Leather accents and structured panels |
| Embroidery | Wider eye with a light ballpoint | Rayon, polyester embroidery thread, woven or knit grounds | Machine embroidery |
Start with the fabric structure
A Universal needle is a dependable starting point for ordinary woven quilting cotton. It has a slightly rounded point, so it handles everyday piecing without the aggressive entry of a sharp needle.
For tightly woven cottons, microfiber, and silk, a Microtex needle gives a more precise entry. The narrow, acute point is useful when clean stitch definition matters and the fabric has a firm weave.
Knits need a different approach. A ballpoint or jersey needle pushes between loops instead of slicing through them, reducing the risk of laddering. A stretch needle is appropriate when the fabric has substantial elasticity or the machine is skipping stitches on a knit mix.
Match the specialist to the project
Quilting needles have a reinforced blade and tapered point for moving through layered quilt tops, batting, and backing. Denim needles are heavier and stronger, making them better for canvas, denim, or thick home décor layers than a standard quilting needle.
Topstitch needles support heavier threads because their longer eye and deeper groove reduce friction. Leather needles have a wedge-shaped point, so they should stay away from cotton fabrics. That sharpened tip can damage a woven quilt top.
Embroidery needles balance a wider eye with a point intended to protect the ground fabric. For a closer look at fabric structures before choosing a point, use this overview of common quilting fabric types.
A Three-Step Workflow for Every Project
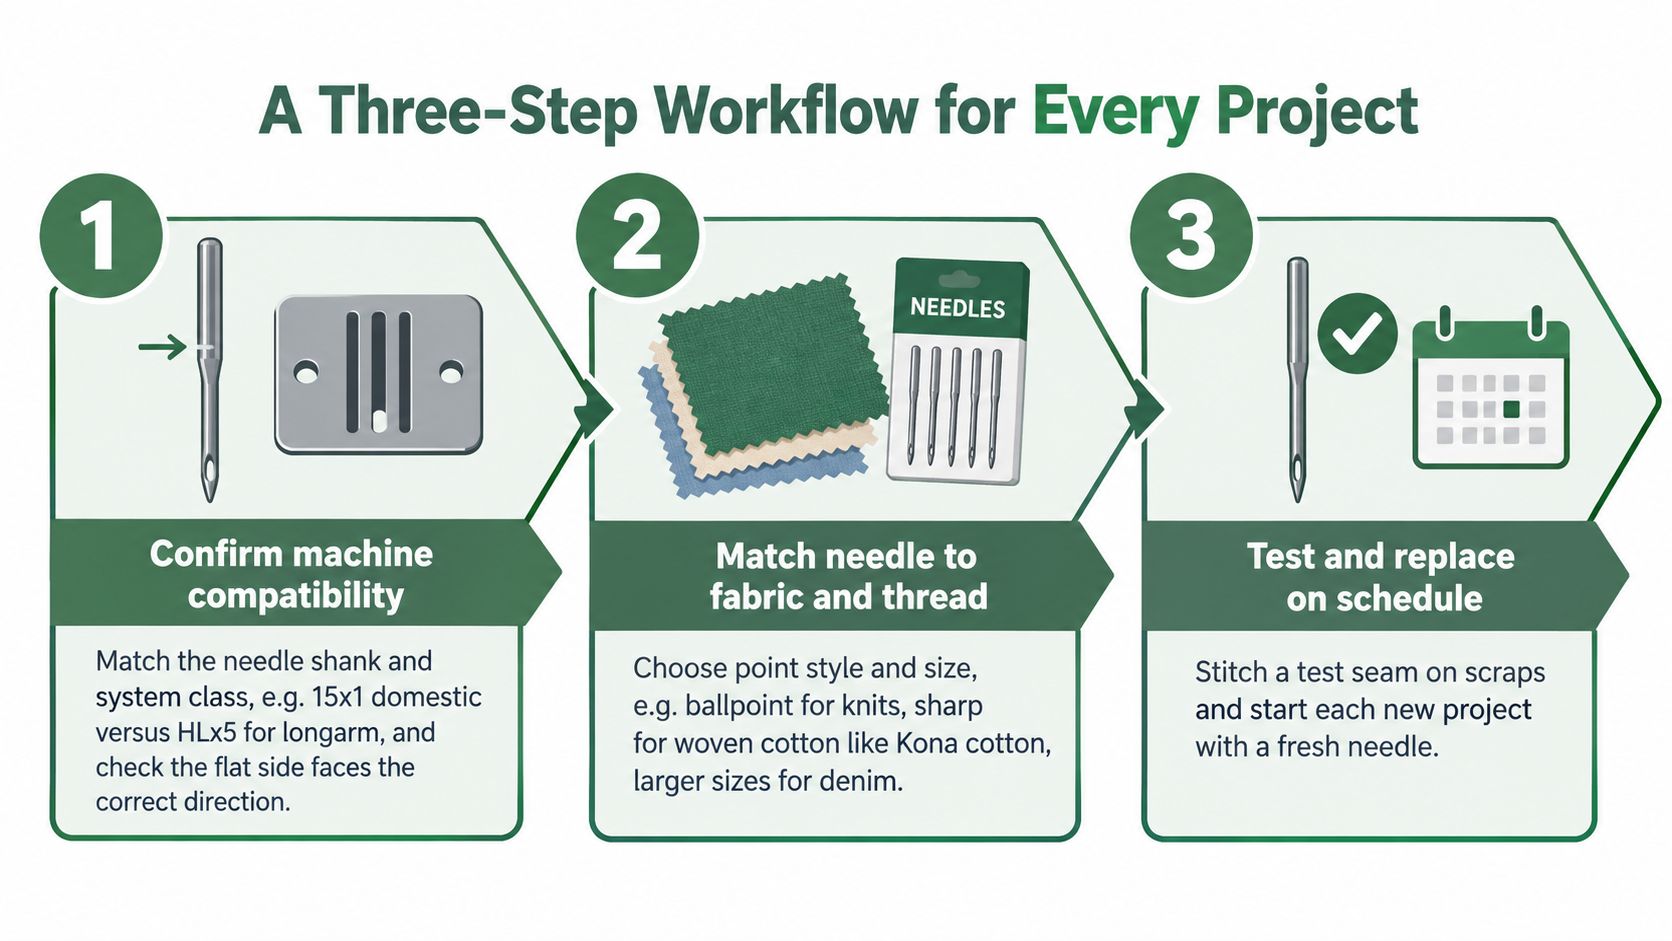
A repeatable workflow removes most of the guesswork. I use it before sewing the first permanent seam, and I test on the actual fabric combination rather than a random scrap from another project.
- Confirm machine compatibility. Check the manual for the needle system, shank shape, orientation, and maximum recommended size. A domestic machine may use a 15x1-style needle, while a longarm can require an HLx5 system. The needle must also sit with its flat side facing the direction specified by the machine.
- Choose the point style. Use a sharp or Microtex point for woven cotton and precision piecing, a ballpoint or stretch point for knits, and a quilting point for a layered sandwich. The point should suit the dominant fabric structure, not just the color or pattern.
- Size the needle to fabric and thread. Fine lawn and voile generally call for 60/8 to 70/10, general quilting cotton often works with 75/11, and layered piecing may need 80/12. Heavy denim, canvas, or multiple dense layers can require 90/14 to 100/16. Brother's needle guide maps lightweight fabrics to 9/70 to 11/80, medium fabrics to 14/90, and heavier fabrics to 16/100 through 18/110.
A worked baby-quilt example
Suppose the quilt top uses tightly woven quilting cotton and the backing is soft flannel. The project has woven surfaces, but the flannel adds thickness and can create more drag than a single cotton layer.
I'd confirm the machine system, choose a Universal or quilting point, and begin with 80/12 if the layers feed comfortably. I'd sew a test seam through the complete top, batting, and flannel backing, then inspect skipped stitches, thread abrasion, and hole size before committing to the quilt.
Presser-foot clearance and feeding can change the result as much as the needle. If the fabric is shifting or the seam allowance is difficult to control, review the options in this guide to quilting presser feet.
Matching Needle to Thread and Layered Builds
Thread thickness changes the needle decision because the thread must move freely through the groove and eye. Coats emphasizes that the eye should fit the thread size, and its needle reference highlights thread compatibility alongside fabric and machine considerations.
A simple eye test can expose a mismatch. Place the thread through the eye of the candidate needle, hold the needle vertically, and observe how the needle slides. A slow spiral suggests a useful match, while a needle that drops too quickly may be too large and one that sticks may be too small.
Use the whole quilt sandwich
The thickest point in the build matters. A seam intersection, dense batting, or a folded border can demand more from the needle than the flat top fabric does.
| Layer Count & Build | Recommended Needle | Thread Weight | Notes |
|---|---|---|---|
| Single woven top during piecing | 75/11 sharp | 50-weight cotton | Favors precise entry and small holes |
| Two-layer top or ordinary layered piecing | 80/12 | 50-weight cotton | A practical general quilting combination |
| Three or four layers with mid-loft cotton batting | 90/14 quilting | 40-weight or 50-weight | Provides more clearance and stability |
| High-loft wool or multiple bordered layers | 100/16 | Heavier cotton or polyester | Test machine limits before sewing |
| Decorative or appliqué stitching | 80/12 topstitch | 40-weight or 30-weight | Larger eye helps heavier thread pass |
| Very heavy or metallic thread | 90/14 or metallic needle | 12-weight or metallic | Use an eye designed to reduce abrasion |
For a 50-weight piecing cotton, a 75/11 sharp needle is a sensible pairing on a firm woven top. A 40-weight appliqué thread or 30-weight decorative thread generally benefits from an 80/12 topstitch needle with a larger eye. Heavy 12-weight and metallic threads may need 90/14 or a dedicated metallic needle.
Special cases in quilting
A 108-inch wideback doesn't automatically require a larger needle. The decision depends on the complete sandwich, thread, batting density, and machine clearance. A smooth cotton wideback with low-loft batting may sew comfortably with a quilting 90/14, while dense or high-loft construction deserves a scrap test first.
Wool batting can create drag because of its loft and surface texture. On a longarm, listen for increased resistance and check whether the needle is deflecting at dense areas. T-shirt quilt tops bring a different issue, since knit panels may need a ballpoint or stretch needle even when the surrounding cotton is woven.
For thread selection alongside these builds, consult this guide to the best thread for quilting. The thread label, needle eye, and fabric sandwich should agree before you adjust tension.
When to Change Your Needle and How to Spot Problems
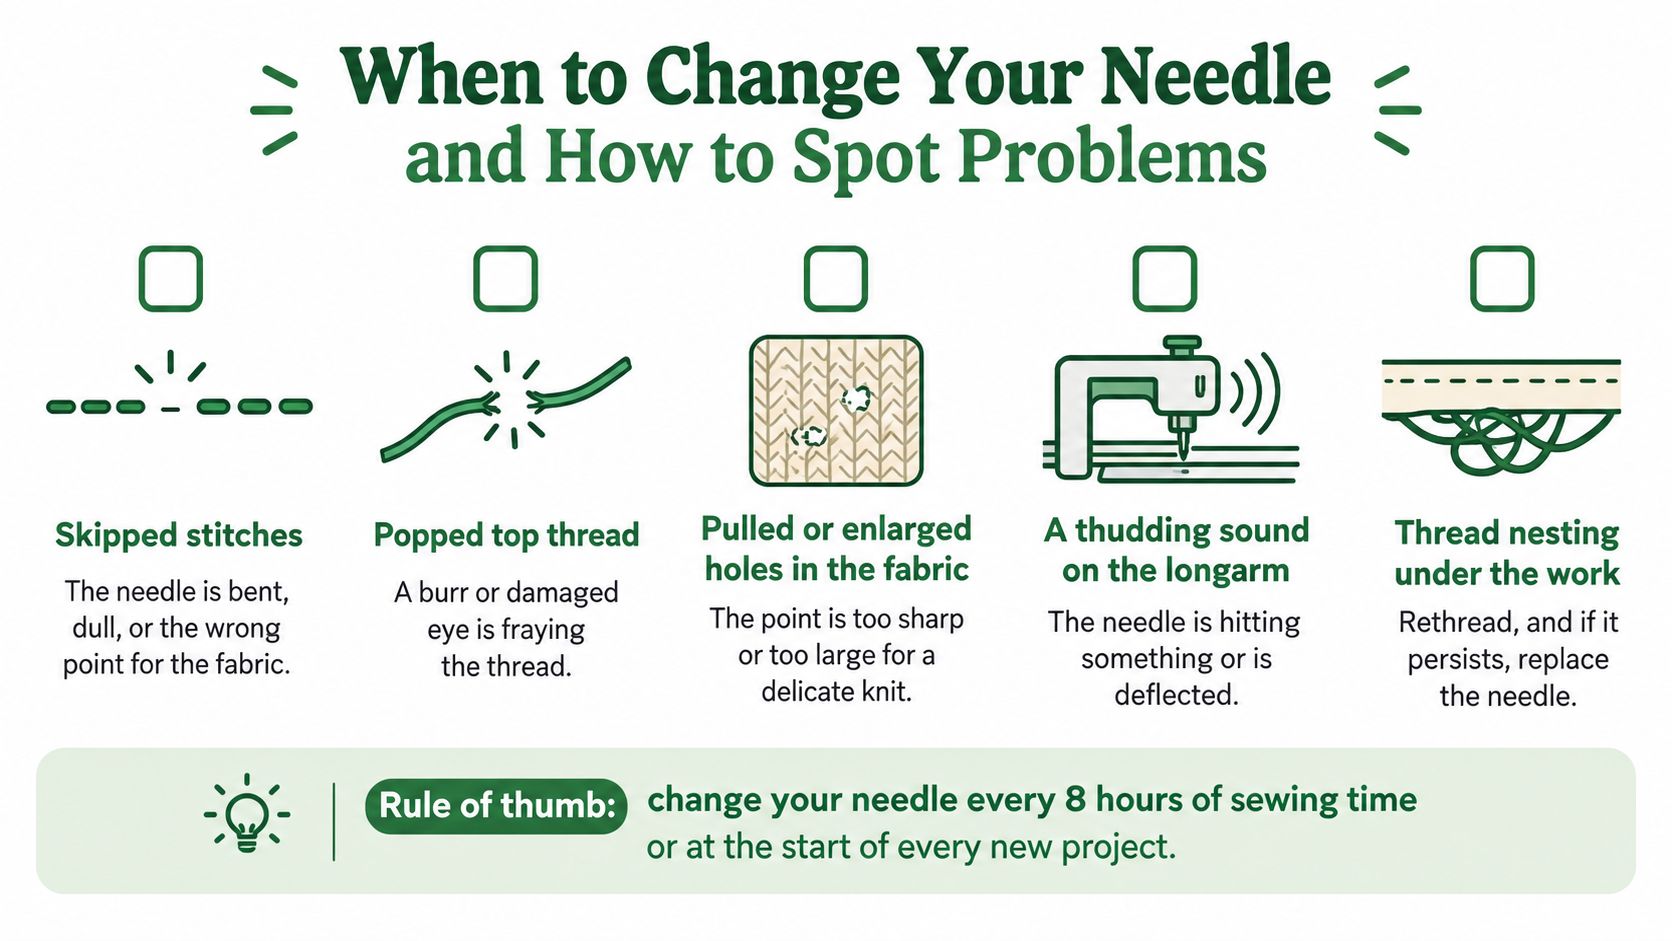
A needle can sew smoothly early in the day and cause trouble later, especially after repeated passes through batting, fusible material, or dense seams. Treat these changes as clues from the machine, not random annoyances.
Common signs include:
- Skipped stitches: The needle may be bent, dull, or the wrong point for the fabric.
- Popped top thread: A burr or damaged eye can scrape the thread as it moves.
- Pulled fabric holes: A sharp or oversized point can damage a delicate knit.
- Thudding on a longarm: The needle may be striking a dense area or deflecting from the sandwich.
- Thread nesting underneath: Rethread the machine first. If nesting continues, install a fresh needle.
Inspect before changing everything else
Remove the needle and examine it under good light. Replace it immediately if the shaft is bent, the point is blunt, the surface has a burr, or the eye looks hooked. A magnifier can reveal a rough spot that catches thread even when the needle appears straight.
Needle life depends on the fabric, thread, batting, and machine. Brother's technical guidance discusses replacement after about 8 to 10 hours of machine use, while SINGER advises replacement after 6 to 8 sewing hours. Use those figures as a starting point, then change the needle sooner after fusible products, scrim-backed batting, dense seams, or demanding longarm passes. SINGER's maintenance guidance should be consulted for machine-compatible sizes and types.
Use this troubleshooting ladder:
- Stop sewing and raise the needle.
- Rethread the upper path and check the bobbin.
- Install a fresh needle with the correct orientation.
- Test the full fabric, batting, backing, and thread combination.
- Adjust tension only after the needle and threading pass the test.
Keep a reference for machine quilting thread nearby when diagnosing thread breaks or abrasion. A fresh needle before a demanding layered project can prevent damage to the quilt top.
Quick Reference for Common QuiltKit Projects
Use this chart as a starting point, then sew a test seam with the complete project build. Needle choice depends on the fabric, thread, batting, backing, and machine, not fabric weight alone. A cotton top may need one needle for piecing and another once a wideback, specialty batting, or dense quilting pattern enters the stack.
| QuiltKit Project Type | Recommended Needle | Size (Metric/Singer) | Recommended Thread |
|---|---|---|---|
| Cotton baby quilt | Universal | 80/12 | 50-weight cotton |
| Multi-layer bed quilt with low-loft cotton batting | Quilting | 90/14 | 40-weight or 50-weight |
| Denim or utility project | Denim | 90/14 or 100/16 | 30-weight or 40-weight |
| T-shirt quilt or knit-mix top | Stretch or ballpoint | 80/12 | Polyester |
| Appliqué or embroidery detail | Embroidery | 75/11 | 60-weight |
| Leather or cork accent panel | Leather | 90/14 | Bonded nylon or polyester |
| Wideback-backed longarm quilt | Topstitch or quilting | 90/14 | 30-weight |
Keep a small working selection
Home machines commonly handle 80/12 to 90/14 well, while a longarm may accept larger needles when its manual permits them. Keep several point styles and sizes available because the machine may move from cotton piecing to a layered quilting pass in the same project.
A mixed pack containing 75/11, 80/12, and 90/14 covers many transitions from piecing to quilting without requiring a mid-project shop run. Choose the smaller size when it forms clean stitches through the stack. Move up when the thread is heavier, the batting is dense, or the needle struggles through a thick seam.
For widebacks and specialty batting, test the actual layers together. A needle that passes easily through the quilt top can still deflect, shred thread, or produce skipped stitches once the backing and batting increase resistance. On a longarm, check the thickest seam and the most heavily quilted area rather than testing only an open patch.
The best needle is the smallest one that forms clean stitches through the entire build without forcing the thread through a cramped eye.
QuiltKit brings together ready-to-sew quilt kits, Kona Cotton Solids, Ruby Star Society fabrics, coordinated bundles, precuts, wideback cottons, and batting from brands such as Hobbs, Pellon, and The Warm Company. Browse the QuiltKit quilting collection to compare project materials, then test the fabric, backing, batting, and thread combination at your machine.
People Also Ask
What size needle is best for quilting cotton?
A 75/11 sharp or quilting needle is a useful starting point for quilting cotton. An 80/12 can suit slightly heavier or layered work. Test the complete fabric and thread combination before sewing the finished quilt.
Should I choose a needle for the top, backing, or batting?
Choose for the entire layered build, with particular attention to the thickest seam, densest batting area, and thread size. The top fabric alone does not show all the resistance the needle will meet.
Can I use a universal needle for a quilt?
Yes. A Universal needle can work well for general woven quilting cotton. Change to a quilting, Microtex, topstitch, or specialty needle when the fabric structure, layers, or thread calls for a different point or eye.
How do I know whether my needle is too large?
Look for enlarged holes, fabric distortion, or a mismatch between the thread and eye. If the thread drops quickly during the vertical eye test, the needle may be larger than necessary.
How often should I replace a sewing machine needle?
Technical guidance commonly places replacement around 8 to 10 hours of use, while some manufacturers recommend a shorter interval. Replace it immediately if it bends, develops a burr, skips stitches, or begins damaging the thread or fabric.
Ready to make the next seam easier? Explore QuiltKit for ready-to-sew quilt kits, coordinated fabrics, wideback cottons, and batting that support a complete fabric-plus-thread-plus-machine plan. If you are comparing projects, join the QuiltKit Email Sign-up Savings list for inspiration and offers before choosing your next needle drawer essential.