


Standard King Size Quilt Dimensions and Yardage Guide
A standard king mattress measures about 76 by 80 inches, and a practical finished king quilt is commonly about 108 to 114 inches wide by 108 inches long, with the exact target depending on mattress depth and desired side drop. A standard king size quilt should be planned around the bed it will cover, not the size label alone.
You may already have a pattern on the cutting table and a backing fabric in your shopping cart. Before buying either, check where you want the quilt to end on the dressed bed, then account for what happens during quilting, trimming, binding, and washing.
Why Standard King Size Quilt Dimensions Vary
Stand beside the bed with a tape measure rather than measuring only the empty mattress. Include the topper and bedding that will sit underneath the quilt, and decide whether the finished edge should reveal the frame or conceal it.
The distinction between mattress dimensions and finished quilt dimensions is fundamental. The mattress establishes the sleeping surface, while the quilt needs additional fabric for the coverage you want beyond that surface.
Measure the look you want
Drop means the distance from the top edge of the mattress down to the quilt's finished edge. Mattress depth helps you choose that distance, but it doesn't determine it automatically.
- Side drop: Decide where the binding should sit along both sides of the bed.
- Foot drop: Check the end separately, especially if there's a footboard or bench.
- Pillow tuck: Allow additional length only if the quilt will wrap over or around pillows.
- Frame clearance: Keep the quilt clear of storage drawers and the floor.
A deep mattress may need generous coverage, but a low platform frame can look better with a shorter, deliberate finish. A larger quilt isn't automatically a better-fitting quilt.
Practical rule: Choose the position of the finished binding first. Work backward from that position to the materials you need.
Separate the label from the specification
The familiar U.S. king mattress baseline is approximately 76 by 80 inches, but bed terminology varies internationally, as the bed-size reference explains. Verify the recipient's actual mattress before committing to a gift quilt.
A useful pattern or kit description should distinguish the pieced top from the quilted, bound, and washed project. Those measurements answer different questions, and a king label can't substitute for them.
I'd prioritize a clear finished-size specification over a reassuring size name. That's an editorial recommendation, not a claim that every maker should prefer the same amount of drape.
The Finished Size Calculator in Plain English
Start with the required coverage, then use these formulas:
- Finished width: Mattress width plus twice the desired side drop.
- Finished length: Mattress length plus foot drop plus optional pillow-tuck allowance.
- Production dimensions: The finished target adjusted for your construction method and tested dimensional change.
The NCOA mattress-size guide supports the standard king baseline and this coverage-based planning approach: a 16–19-inch side drop produces approximately 108–114 inches of width, while a 14–15-inch foot drop produces approximately 94–95 inches of length before pillow tuck.
Use the visual formula as a layout aid, then enter the measurements from your own bed.
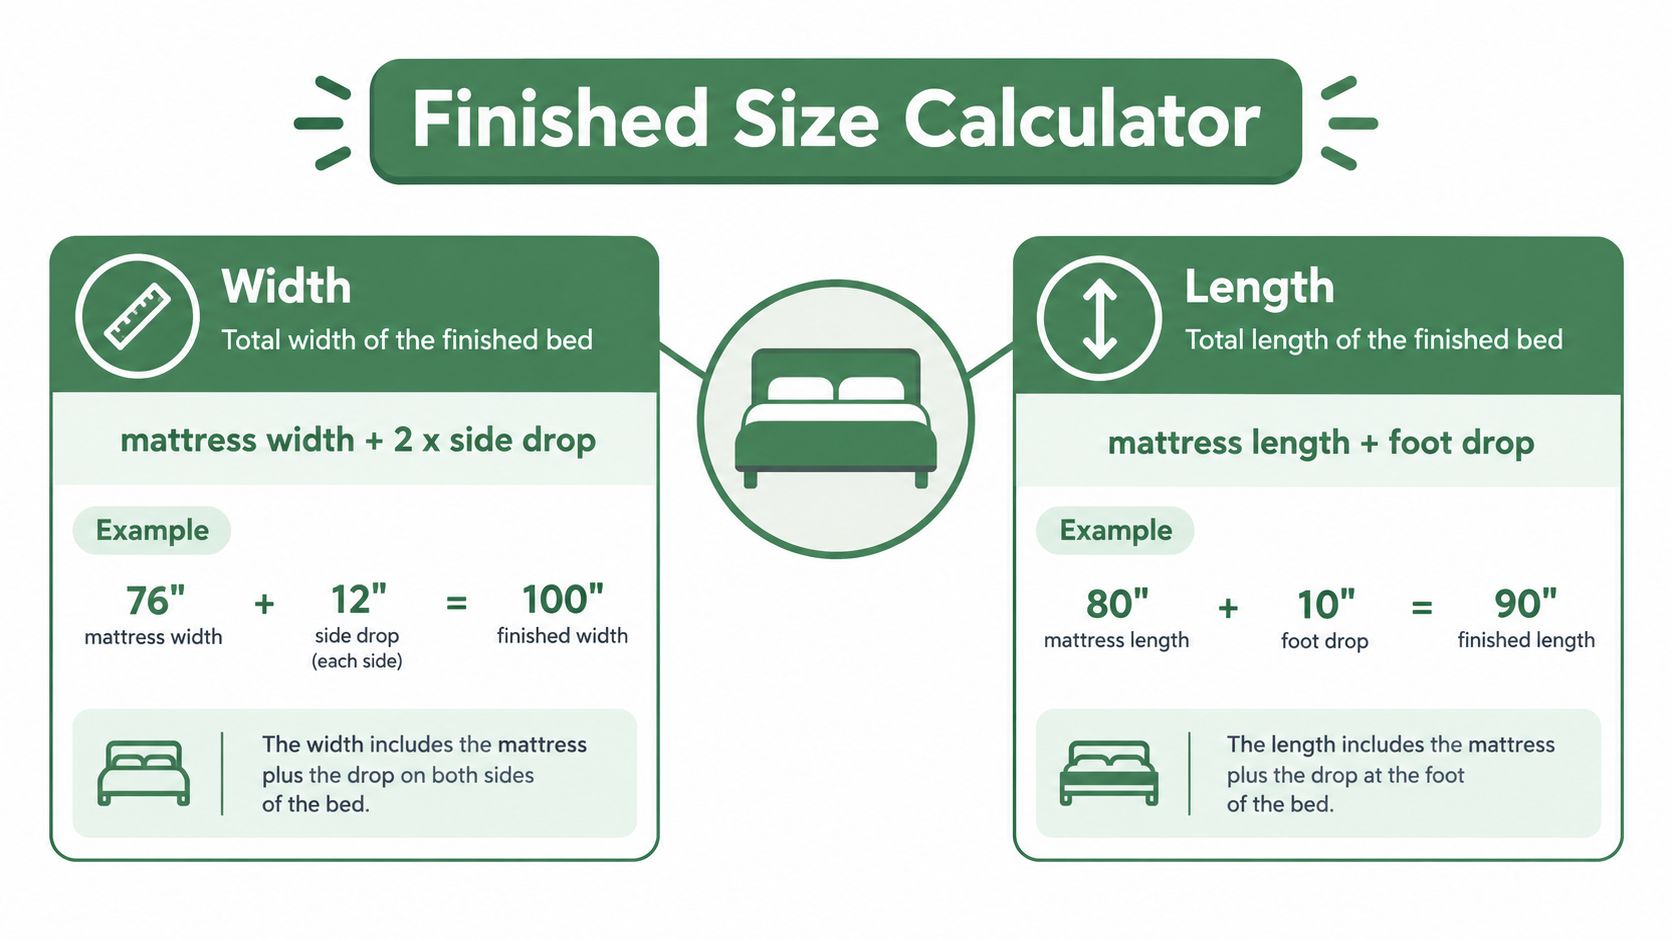
Finished King Quilt Width and Length by Drop
The following are illustrative planning scenarios, not standard quilt sizes assigned to particular mattress depths. Their dimensions follow the formula and drop ranges cited above; all finished lengths exclude pillow tuck.
| Mattress depth | Side drop | Finished width | Foot drop | Finished length |
|---|---|---|---|---|
| Hypothetical low-profile mattress, 10 inches | 16 inches | 108 inches | 14 inches | 94 inches |
| Hypothetical pillow-top mattress, 14 inches | 16 inches | 108 inches | 15 inches | 95 inches |
| Hypothetical deep mattress on an upholstered platform, 18 inches | 19 inches | 114 inches | 15 inches | 95 inches |
Notice that the deeper mattress doesn't automatically receive more foot coverage. Side and foot drops are independent decisions, and a footboard may make a shorter foot drop preferable.
Check the target on the bed
Drape an existing blanket over the mattress and position its edge where you want the binding to land. Measure that position instead of guessing from mattress thickness.
For a tall upholstered platform, decide whether the upholstery is part of the bedroom design you want to show. If it is, do not bury it because a size chart recommends a generous drop.
Write width, length, and pillow tuck included or excluded on your planning sheet. That small distinction prevents a square pattern from being mistaken for a universally correct king-bed shape.
Standard King vs California King vs Coverlet
Standard king and California king describe mattress proportions. Coverlet and bedspread describe how the quilt is intended to function, so they belong to a different part of the sizing decision.
A California king measures approximately 72 by 84 inches, making it 4 inches narrower and 4 inches longer than the standard king baseline described earlier. Those mattress specifications explain why switching between the beds changes both side coverage and foot coverage.
Compare the purpose before choosing the pattern
| Bed or quilt description | What it tells you | What still needs checking |
|---|---|---|
| Standard or Eastern king | The mattress category | Actual depth and desired coverage |
| California king | A narrower, longer mattress category | Whether the quilt has enough length |
| Coverlet | A tailored decorative layer | Where its edge should end |
| Bedspread-style quilt | More extensive bed coverage | Frame concealment and pillow arrangement |
A coverlet doesn't have to stop exactly at the mattress edge. Its practical purpose is a shorter, custom finish rather than full concealment of the bed base.
A bedspread-style quilt may need more length for the foot and pillows. That additional length should be intentional, not an accidental consequence of choosing an oversized square.
A quilt can fit both mattress categories without creating the same drape on both.
Make gift measurements explicit
For a graduation or collegiate gift, ask for the mattress measurements and a photograph of the dressed bed. Team spirit determines the colorway, but it doesn't establish the finished dimensions.
If the quilt will move between a bedroom and game-day use, discuss which purpose matters most. A bed quilt and a portable tailgate quilt don't necessarily need the same proportions or handling characteristics.
Before ordering a kit, verify whether its stated size applies to the top alone or the completed project. Don't assume borders, backing, or pillow coverage are included.
Yardage for the Pieced Quilt Top and Borders
There's no dependable universal yardage total for a pieced king quilt. Fabric requirements depend on the pattern's cutting plan, usable fabric width, print direction, and the amount of fabric consumed by seams and trimming.
Keep the cutting layout beside the finished-size worksheet. The tools shown below are useful for checking units before committing to long border cuts.
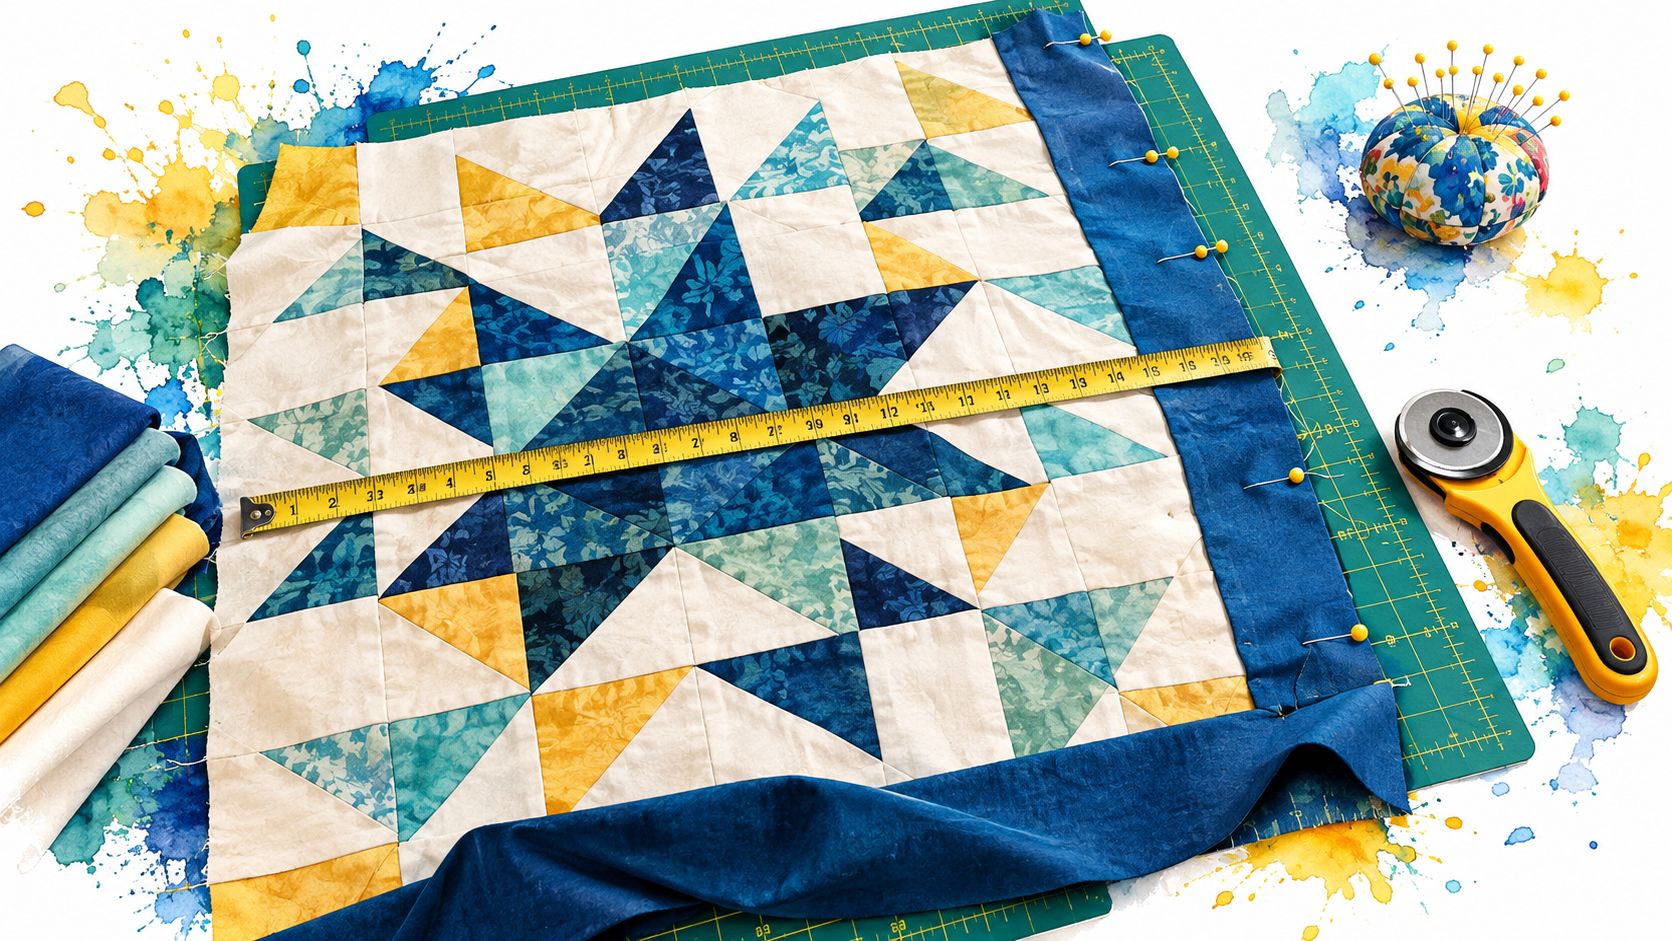
Work from finished units to cut pieces
A seam allowance is the fabric between the stitching line and the raw edge. Follow the pattern's allowance consistently, and don't confuse a block's cut dimensions with its finished dimensions.
- Calculate the center first: Use finished block dimensions and the intended layout.
- Add border coverage: Subtract the border contribution from the overall target to establish the center dimensions.
- Plan strip cuts: Check whether the fabric permits the required strip lengths or needs joins.
- Calculate binding separately: Use the quilt perimeter and the binding method specified in your instructions.
Use the fabric-yardage calculation guide to turn that cutting list into a shopping quantity. An area-based estimate alone won't account for triangles, directional motifs, or discarded trimming.
Borders need measurement, not stretching
Measure the assembled center before cutting borders. If the center isn't square, resolve that problem rather than stretching a border to match an uneven edge.
A directional print may require a different cutting layout from a solid. Large repeats also need deliberate placement, especially when a border seam would interrupt a prominent motif.
Precuts and coordinated bundles can simplify color selection, but check their contents against the pattern instructions. A convenient bundle isn't proof that you have enough of every fabric.
Keep the written cutting plan nearby when reviewing construction techniques.
For binding, preserve enough fabric to complete the full perimeter with your preferred joins. Don't rely on whatever happens to remain after piecing.
Backing With 108 Inch Widebacks and Seamed Panels
Nominal backing width isn't the same as usable loading width. A wideback can reduce piecing, but it still has to accommodate the actual top and the extra fabric required by the quilting method.
The material-planning reference on quilt batting and backing allowances explains that a 108-inch-wide quilt generally needs wideback fabric or seamed backing, with batting and backing extending several inches beyond the top on every side.
Compare wideback and pieced backing
| Backing choice | Practical advantage | Planning trade-off |
|---|---|---|
| Wideback fabric | Fewer backing seams | Usable width may not provide loading allowance |
| Seamed standard-width panels | Flexible overall dimensions | Joins and print direction require planning |
| Designed pieced backing | Can incorporate coordinated fabric | More seams need inspection before loading |
A nominal 108-inch wideback shouldn't be assumed to back a top of the same width without modification. Selvage removal and the required loading margin can make that plan too tight.
Place seams deliberately
For a seamed backing, sketch the layout before cutting. An off-center join can avoid an obvious central line, but direction, pattern matching, and the quilter's loading preferences should guide the final placement.
Read the quilt-backing fabric guide before choosing panel orientation. Ask the longarm quilter how they want backing seams pressed and whether the planned layout suits their loading method.
Don't cut backing to the quilt's final bound size before quilting. The excess serves a working purpose, and trimming belongs after the layers have been quilted.
Loading check: Give the quilter your actual top dimensions, not just the name of the pattern size.
Backing color also affects the finished appearance. Consider whether thread contrast and stitching will be a feature of the reverse or something you'd rather keep understated.
Batting Selection Loft and Quilting Distance
Batting should be chosen by fiber composition, loft, care requirements, and permitted quilting distance, not by brand name alone. Hobbs Bonded Fibers, Pellon, and The Warm Company are useful reference points, but their individual products need separate evaluation.
Loft means the batting's thickness or fullness. It affects the profile of the finished quilt and the appearance of the stitching, so assess it alongside the way you want the quilt to hang.
Match the batting to the intended finish
- Cotton batting: Consider it when a flatter, textured finish suits the project, while planning for dimensional change.
- Cotton-polyester blends: Compare the handling and care specifications of the particular blend.
- Polyester batting: Evaluate loft carefully rather than assuming every polyester product feels alike.
- Fusible or black batting: Choose these for a defined construction or color-management purpose, not as automatic upgrades.
The material-planning reference cited earlier reports approximately 3–5% shrinkage for cotton batting, 2–3% for 80/20 cotton-polyester blends, and minimal shrinkage for polyester products. Those are planning ranges, not guarantees for every package.
The visual comparison below is a starting point for organizing choices. Verify its product-specific descriptions and quilting distances against the current package before sewing.
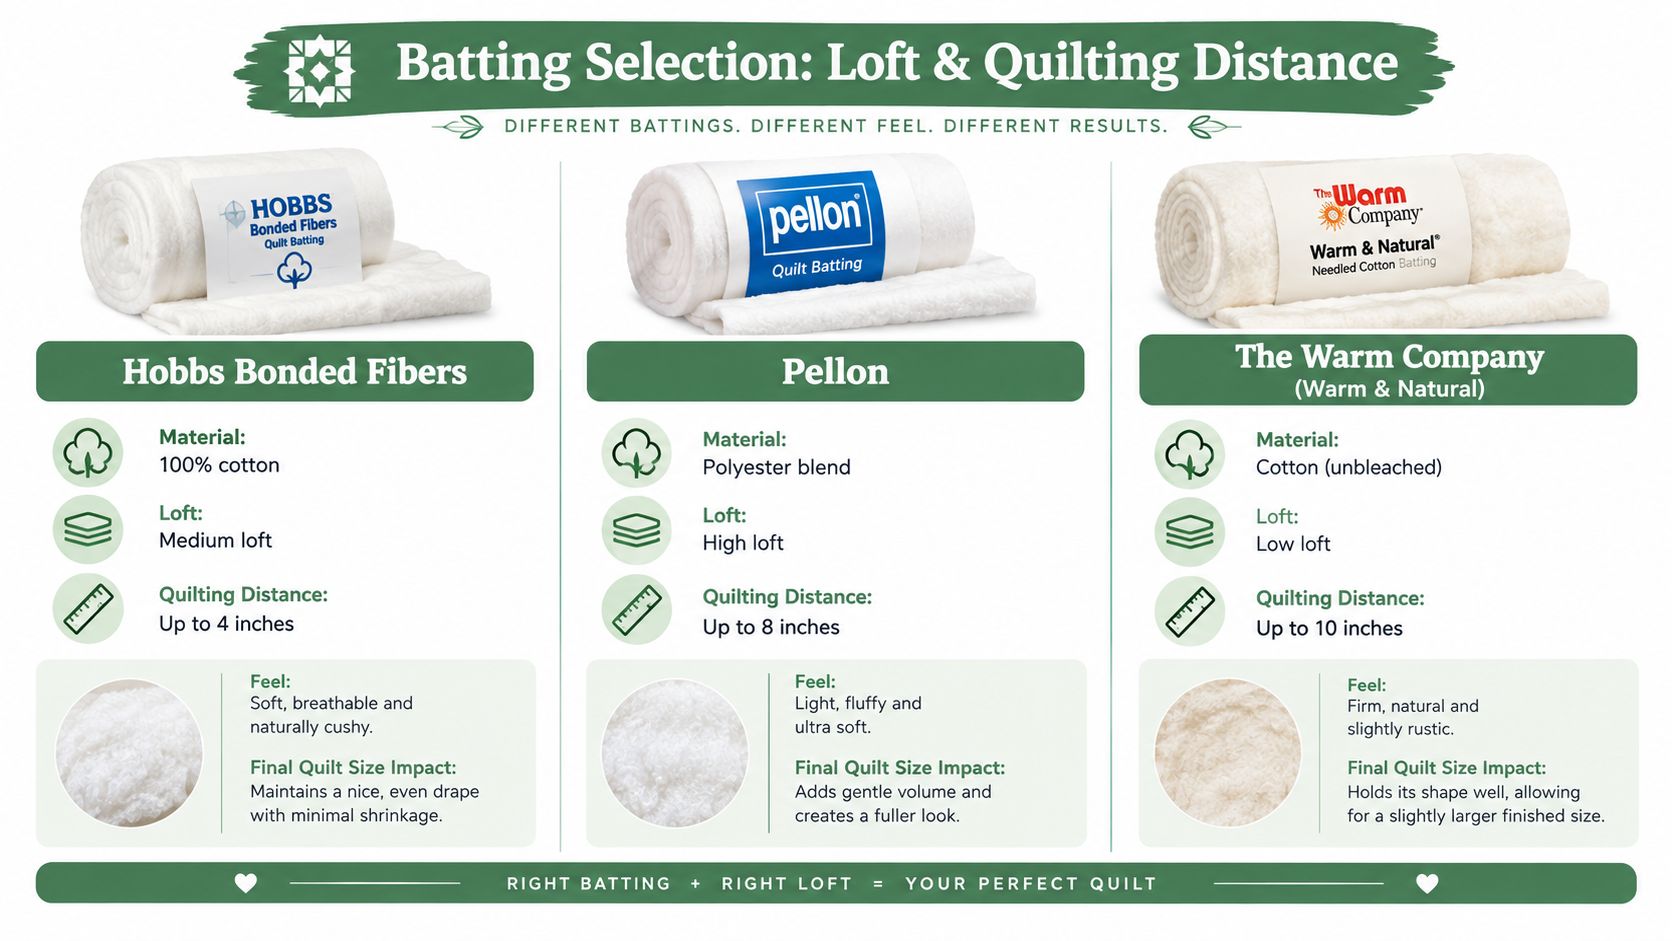
Follow the package rather than a brand-wide rule
Quilting distance is the maximum spacing the manufacturer permits between securing stitches. Don't apply one product's limit to another product from the same manufacturer.
The batting-selection guide can help organize the decision, but the package instructions remain essential. Check whether the batting permits prewashing and what laundering method it requires.
For advanced finishing, test tension and stitch definition with the actual fabric, thread, and batting combination. Examine both sides of the sample rather than judging only the top.
A thick, sculptural sample may look appealing on the table yet be a poor match for the custom coverlet you planned. Choose the batting that supports the intended use, not just the most dramatic texture.
Dimensional Change and the Pre-Production Checklist
A quilt top measured before quilting isn't a reliable promise of washed-bed coverage. Quilting take-up, trimming, and laundering need separate consideration because they happen at different stages.
Using the cotton-batting range cited earlier, a 108-inch quilt could lose roughly 3.2–5.4 inches across after washing if its components haven't been prewashed or otherwise stabilized. That's a planning illustration, not a prediction of precisely how your quilt will behave.
Test the complete material combination
Test representative fabric with the selected batting and intended quilting approach. A fabric swatch alone won't show how the assembled layers respond together.
Review the fabric-care instructions, then follow the specific fabric and batting care requirements. Don't prewash batting unless its manufacturer permits it, even when a general checklist suggests doing so.
Use the infographic as a reminder to measure and record changes, rather than as a universal laundering instruction.
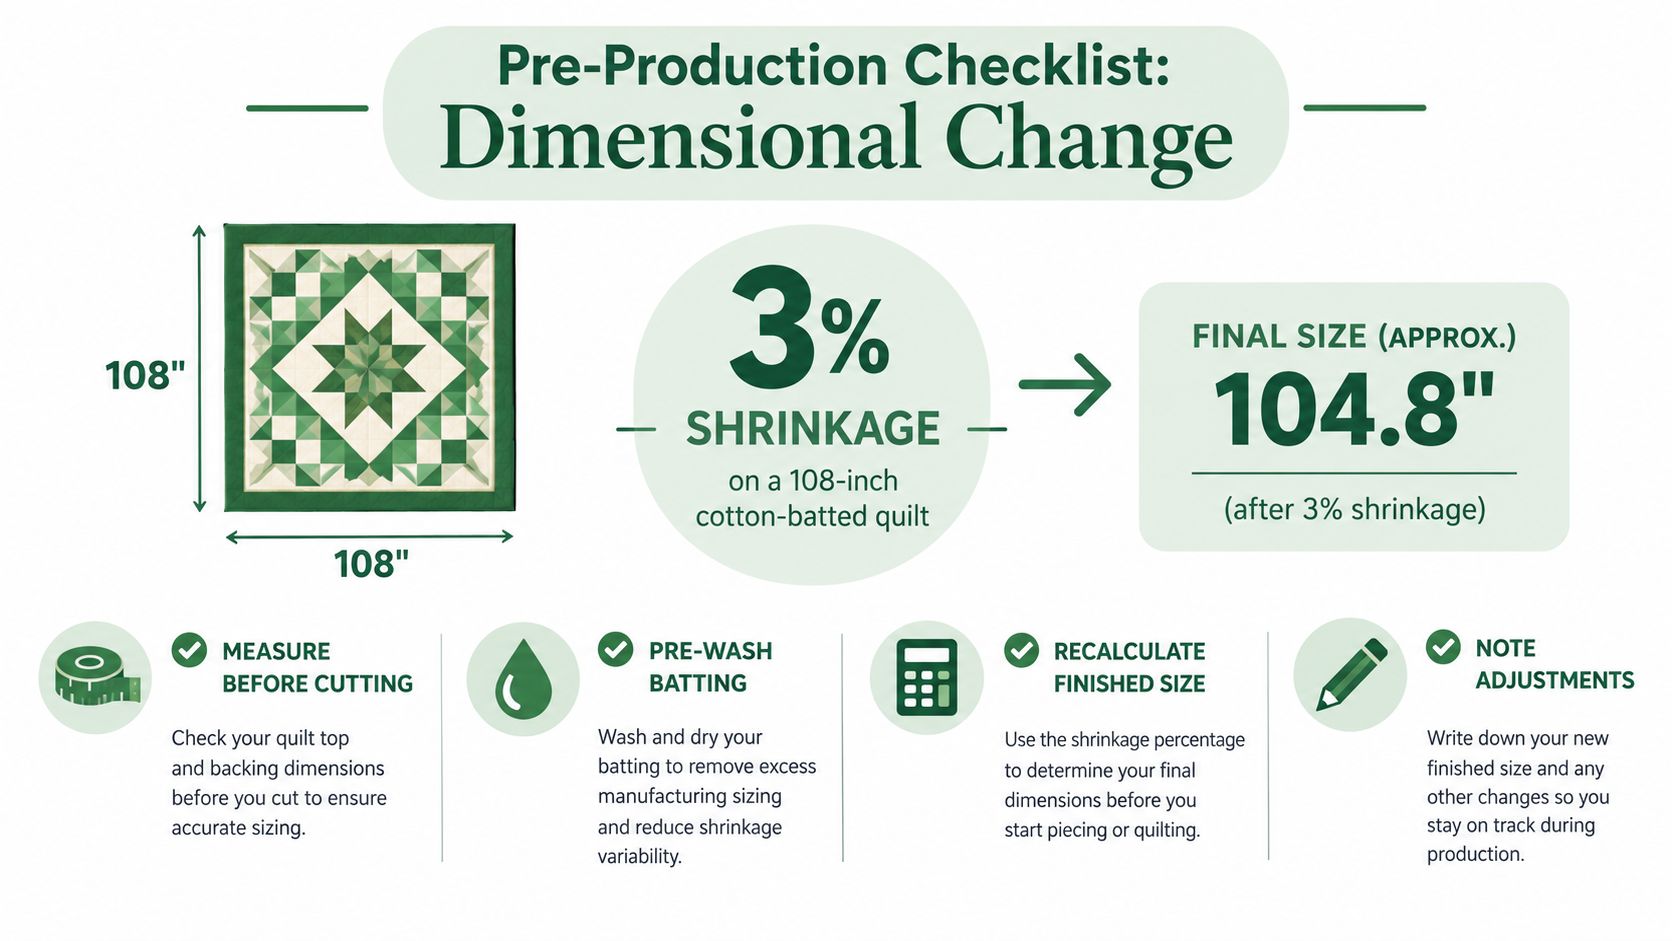
Lock the plan before cutting
- Measure the dressed bed: Record the coverage you want.
- Define the finished target: Specify whether that means bound, washed, or both.
- Test representative materials: Measure before and after the intended care process.
- Confirm loading requirements: Ask the longarm quilter about backing, batting, seams, and trimming.
- Add a project-specific allowance: Base it on the sample and construction method.
- Record the final result: Keep pre-quilting and washed dimensions separate.
I'd rather adjust a border plan before cutting than depend on stretching the finished quilt into place. The dependable approach is to build the allowance into the design and verify the result.
For gifts, include care instructions that match the tested process. Fit after washing matters more than the top's measurement on the cutting table.
Quilt As You Go Versus Finish Then Quilt
Consider a maker working on a domestic machine with limited table space. Even if the machine can stitch the chosen design, supporting a full king quilt may be the more difficult part of the job.
Quilt as you go, often shortened to QAYG, divides the quilting into smaller sections before joining them. The traditional approach assembles the complete top first, then layers and quilts it as one project.
Choose the method around handling and design
| Decision | Quilt as you go | Complete top first |
|---|---|---|
| Machine handling | Smaller sections to support | The whole quilt needs support |
| Quilting design | Often organized around sections | Easier to plan across the entire surface |
| Joining work | Requires a defined section-joining method | Conventional top assembly precedes quilting |
| Finishing plan | Section edges need close attention | Loading and trimming depend on the full top |
QAYG can make a large project more manageable, but it doesn't remove the need for accurate joining. Choose a method with clear instructions for securing the batting and finishing the reverse.
Think through the finish before starting
For a continuous custom design, assembling the complete top may suit the project better. A longarm service is an option when you want that approach without maneuvering the full quilt through a domestic machine.
Read the quilt-finishing guide before committing to either route. Decide how the joins, outer edges, and binding will be completed while you can still alter the construction plan.
Don't assume one method always produces a flatter quilt. Accurate piecing, careful joining, and appropriate quilting matter in both approaches.
Choose the process you can control consistently, not the one that sounds fastest in a pattern description.
For a beginner, manageable sections may be the priority. For a precision finisher, uninterrupted design space may matter more, provided the equipment and loading plan support it.
Quick Reference Card for King Quilt Planning
Use this card to organize the shopping list without losing the distinction between bed coverage and production requirements. The dimension and shrinkage entries refer to the calculations and material references already established above.
- Mattress baseline: Standard king is approximately 76 by 80 inches; verify the actual bed.
- Common finished target: Approximately 108–114 inches wide by 108 inches long, subject to coverage and pillow styling.
- Calculator: Use the finished-size formulas, not the label alone.
- Top yardage: Follow the piecing and border cutting plan.
- Backing: Check usable width and loading allowance before choosing a nominal wideback.
- Batting: Compare fiber, loft, permitted stitch spacing, and care instructions.
- Dimensional change: Cotton's planning range is 3–5%; verify the project with a representative sample.
- Final record: Keep top, quilted, bound, and washed measurements distinct.
Keep the worksheet with the pattern
Attach the measurements to the pattern instructions so the intended finish remains clear throughout construction. If someone else will quilt the top, share that sheet before ordering finishing materials.
Measure the dressed bed before cutting, then keep every purchasing decision tied to that measured target.
Next Steps From Numbers to a Finished Bed
Turn the worksheet into a purchase checklist: pattern or kit first, then backing and batting sized for the production plan. Ready-to-sew formats can simplify preparation, but they don't replace checking finished dimensions and included materials.
For a pixel quilt or half-square triangle design, verify the layout before adding borders. For a team-themed gift, keep color coordination and durability in the plan alongside bed fit.
What are the standard dimensions of a king-size quilt?
There isn't a single universally enforced finished size. Use the common target in the reference card as a starting point, then calculate the coverage your bed requires.
Is a wideback automatically large enough for a king quilt?
No. Compare its usable width with the actual top and the quilter's required working allowance before buying.
Should batting be prewashed before making a king quilt?
Only if the manufacturer permits it. Test the intended care process with representative materials instead of applying a blanket prewashing rule.
Can a beginner make a king quilt without a longarm?
A beginner can consider quilt-as-you-go or a supported domestic-machine workflow. Choose a pattern with clear finishing instructions and assess how you'll handle the project before cutting.
QuiltKit.com offers ready-to-sew kits, wideback cottons, and batting options for turning your measured king-quilt plan into a materials list. Visit quiltkit.com with your finished target and loading requirements, then check the relevant item's dimensions before purchasing. If you're still comparing options, look for Email Sign-up Savings while you finalize the worksheet.