


Patriotic Fabrics by the Yard: A Complete Buying Guide
You've found the perfect red, white, and blue print online. The stars look crisp, the navy is rich, and the fabric seems destined for a table runner or summer quilt. Then the bolt arrives, the repeat is much larger than expected, the red releases dye into the white, and the fabric shrinks unevenly after washing.
That disappointment usually comes from treating appearance as the main buying criterion. Patriotic fabrics by the yard need to work mechanically as well as visually. Fiber content, weave, finished width, print scale, shrinkage, colorfastness, and care requirements all affect whether your project stays straight, bright, and usable.
Choosing the Right Fabric for Your Project
A quilter buying a flag print for a wall hanging may tolerate a different fabric than someone making a frequently washed picnic quilt. The wall hanging might prioritize print clarity and historical character, while the picnic quilt needs stable cotton, dependable color, and a surface that can withstand handling.
I've bought fabric that looked excellent on a product page and behaved badly at the cutting table. Loose threads along the cut edge, a soft weave that shifted under the presser foot, or a saturated navy that left a blue tint in the pressing cloth can turn an inexpensive purchase into an expensive rework.
Start with the cloth, not the motif
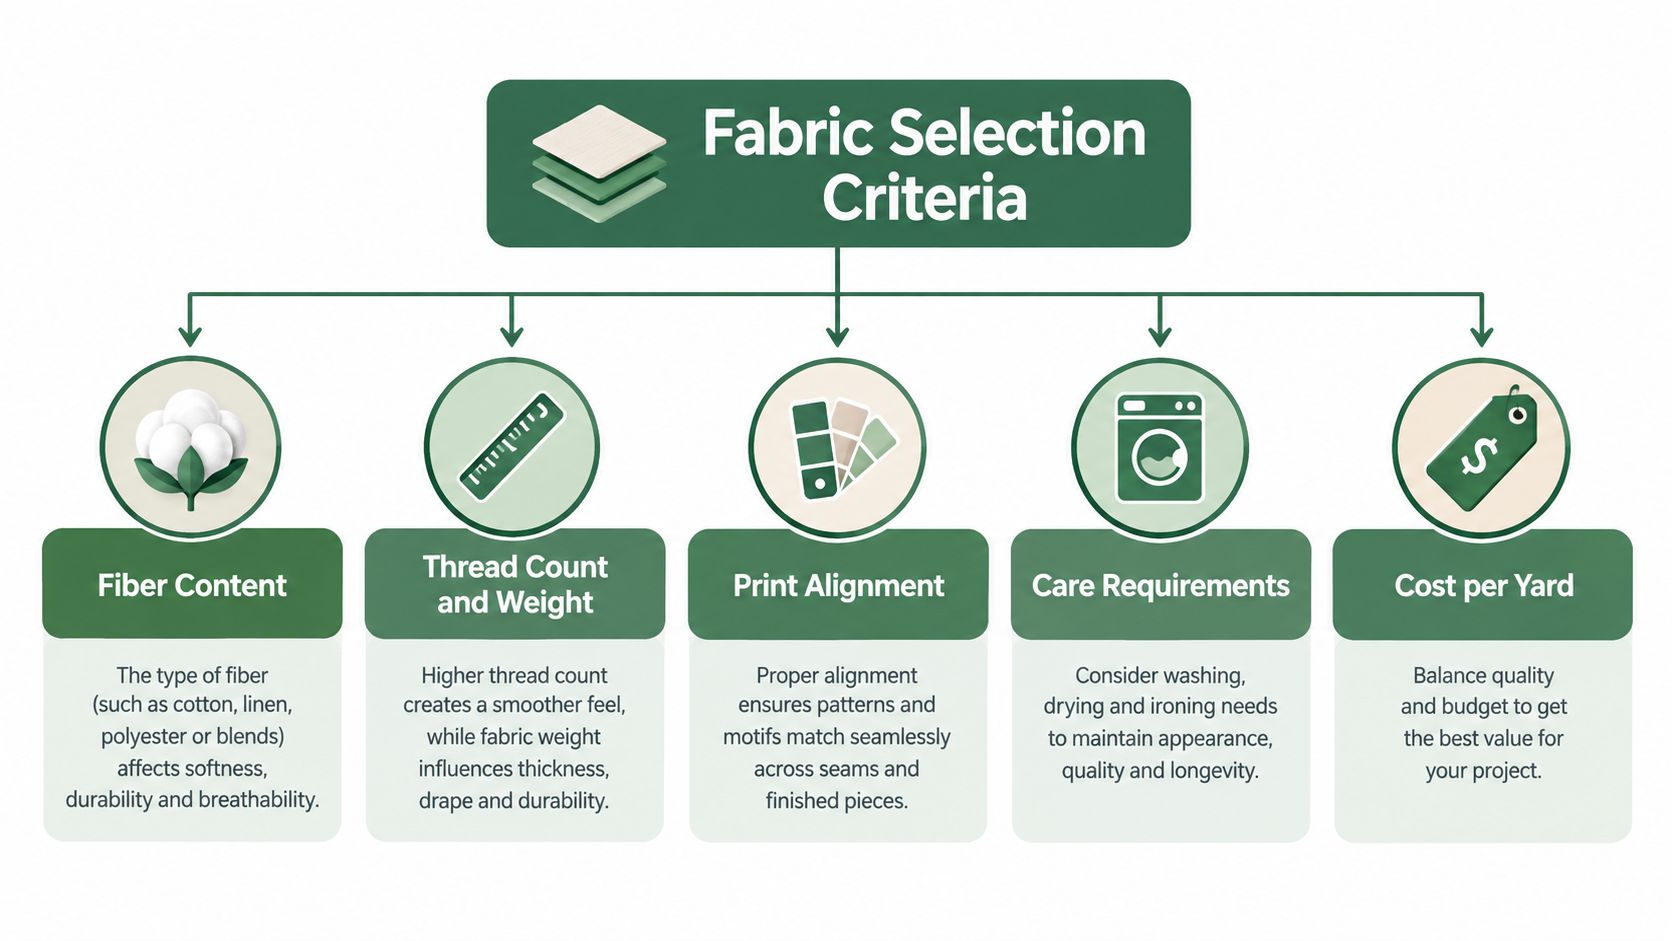
For most pieced quilts, 100% quilting cotton remains the dependable choice because it cuts cleanly, presses sharply, and holds a seam allowance without excessive distortion. A technical benchmark places quilting-weight cotton at approximately 42–44 inches wide and 4.3–4.5 oz/yd², or 145–153 g/m². Those specifications affect both cutting plans and handling, as described in this technical overview of quilting fabric options.
Check the following before placing an order:
- Fiber content: Confirm that the red, white, and blue fabrics will respond similarly to pressing and laundering.
- Finished width: Calculate usable width after removing selvages, not the nominal width printed in a listing.
- Weave stability: A tight, even weave supports precision piecing and usually frays less at seam edges.
- Weight and hand: Quilting cotton should feel stable rather than flimsy, with enough body to fold and press without collapsing.
- Print clarity: Stars, stripes, eagles, and text should have clean edges rather than fuzzy registration.
Match fabric behavior across the project
A lightweight red paired with a denser navy can create different seam bulk and shrinkage. That mismatch may not show while you're assembling blocks, but it can appear as puckering after laundering.
The controlled comparison in the technical benchmark found 0.12% average shrinkage for Kona Cotton after two cold-wash and dry cycles, compared with 0.87% for generic 4.0 oz/yd² cottons. The comparison shouldn't be generalized to every bolt, but it supports treating preparation as part of fabric selection, not as an afterthought.
For a broader introduction to fabric categories and applications, use this guide to different types of quilting fabric. Then request a swatch or buy enough yardage from the same production run whenever color consistency matters.
Evaluating Print Scale and Fabric Repeats
A patriotic print can look small in an online thumbnail and become dominant when spread across a full yard. That difference matters when the design includes large stars, continuous stripes, flags, panels, or directional lettering.
Read the repeat before calculating cuts
The repeat is the distance before a printed design begins again. A small repeat can disappear into half-square triangles or narrow strips. A large repeat may need intentional placement, especially when you want stars centered in blocks or stripes to flow across a border.
Measure the repeat in both directions when the print isn't obviously symmetrical. Then ask how the design will meet at:
- Block seams, where mismatched stars can interrupt an otherwise orderly layout.
- Borders, where a stripe or directional motif may need additional length.
- Binding, where a directional print can rotate unexpectedly at corners.
- Backing seams, where repeated designs may be more visible than expected.
- Fussy-cut sections, which require reserving fabric around a chosen motif.
Practical rule: If the print has a strong direction or a prominent repeat, plan the cuts on paper before buying the final yardage.
Use scale as a design tool
Large-scale prints aren't automatically a poor choice. They can make an effective backing, border, banner, or uncut panel. The problem starts when a dramatic motif is forced into pieces too small to show the intended composition.
For a table runner, place the fabric on a flat surface and mark the approximate finished blocks with removable tape. For a larger quilt, sketch the block grid and identify which fabrics will be cut straight, rotated, or fussy cut. This prevents buying a print whose most important stars will land inside seam allowances.
A balanced fabric pull often includes one dominant pattern, quieter supporting prints, and a solid or low-volume fabric to create visual rest. The principles in this guide to scale and proportion in quilt design are especially useful when combining a bold flag print with small stars, dots, or tonal textures.
Understanding Colorfastness and Wash Testing
Colorfastness is a measurable property, not something you can reliably judge by looking at a bolt. Saturated red and deep navy deserve extra caution because dye loss can create a visible contrast against adjacent white fabric.
A Cotton Incorporated study evaluates color with CIELAB coordinates, color-strength value, or K/S, and total color difference, or ΔE*. It identifies strong home-laundering performance as approximately 0.8–1.5 ΔEcmc and more than 90% retained color strength after 20 wash-and-tumble-dry cycles. The study also reports that powder detergents generally reduce color strength more than detergent-free washing. See the home-laundering colorfastness study for the testing context.
Test before cutting
I once skipped a proper test because the red looked stable on the bolt. A damp white cloth later picked up color from the print, and I had to separate the fabric before it touched any cream background. That small test would have taken less time than correcting a finished block.
Use this sequence:
- Cut a small sample from the actual yardage, including the darkest red or navy areas.
- Wet it with cool or warm water, using the temperature you expect for the finished project.
- Press it against white cotton while damp and again after drying.
- Wash it separately with a color catcher if the project will be laundered.
- Inspect the water, cloth, and sample for loose dye, fading, or noticeable change.
- Repeat with the full fabric pull if multiple manufacturers or collections are involved.
Decide whether to prewash
Prewashing dark solids and saturated prints separately is a practical way to reduce bleeding risk and expose shrinkage before construction. Sort by color, avoid chlorine bleach unless the manufacturer explicitly permits it, and keep the treatment consistent across all fabrics in a quilt.
A color catcher can provide another layer of protection during the first wash, but it isn't a substitute for testing a fabric that releases substantial dye. If the red continues to bleed heavily, reserve it for an unwashed decorative project or replace it.
Selecting Coordinated Widebacks and Batting
The back and middle layers determine how a quilt feels, quilts, and wears. A beautifully pieced patriotic top can lose its polish if the backing is pieced awkwardly, the batting changes the seam profile, or the quilting thread sinks unevenly into the layers.
Build the finishing plan early
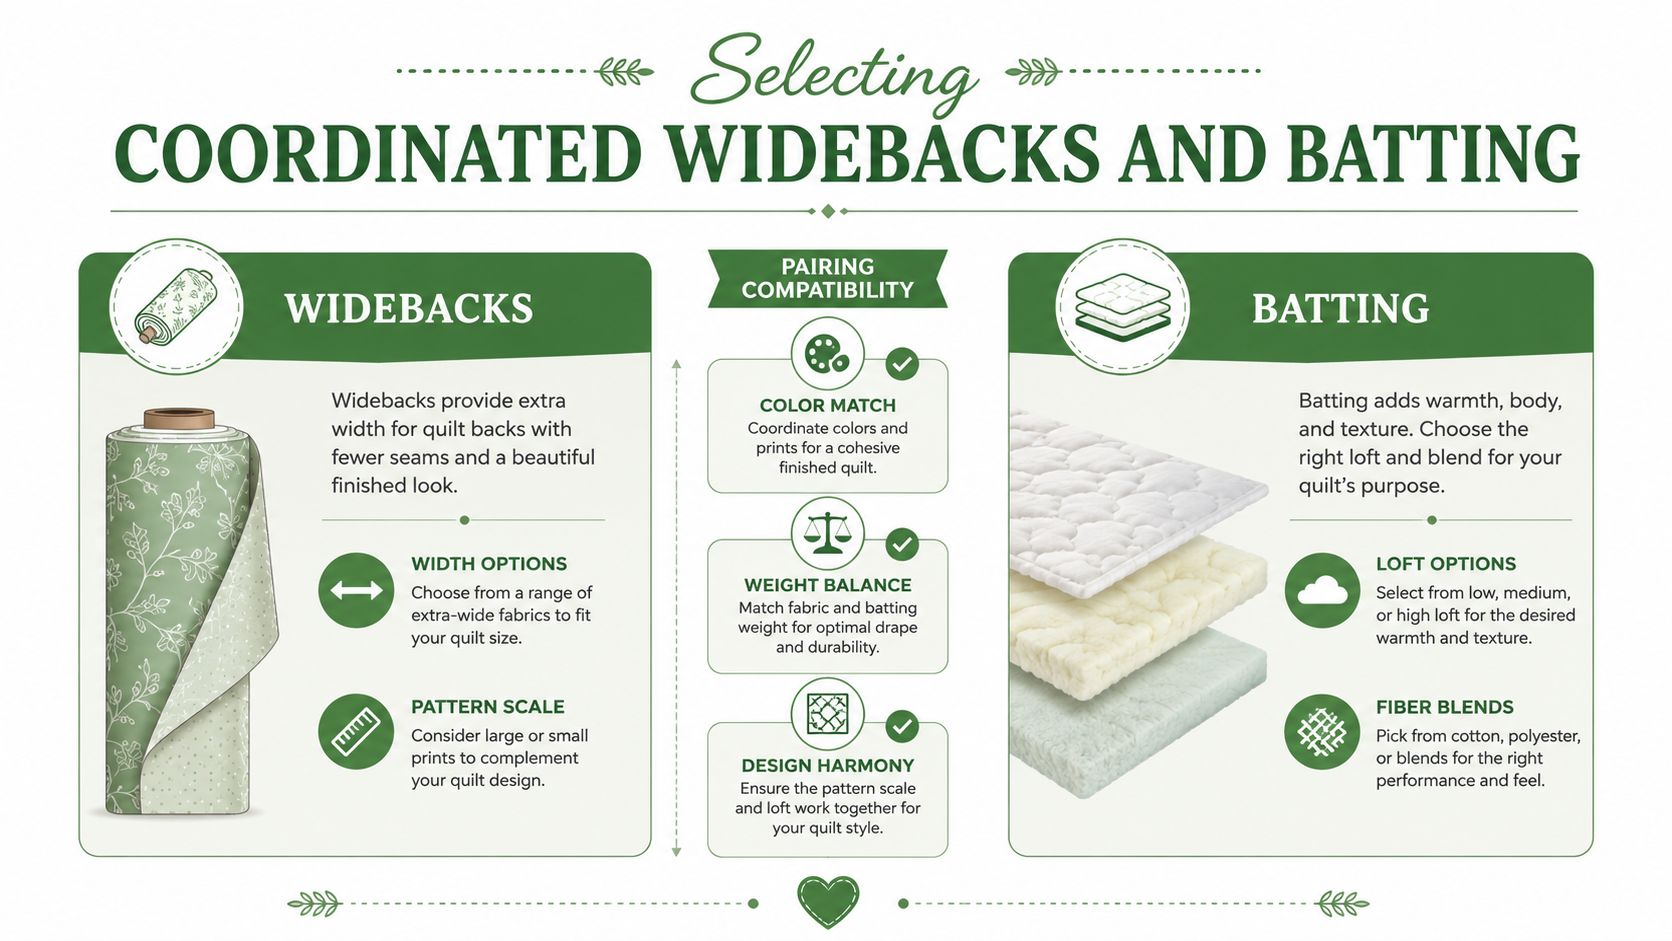
Wideback cottons up to 108 inches can eliminate a central backing seam on many quilts, which simplifies loading and creates a clean reverse side. They're especially useful when the front already contains strong red, white, and blue geometry and you don't want another seam competing with it.
Choose a backing that supports the top rather than repeating every design element. A quiet navy, muted star field, or restrained red-and-white texture can frame the quilting without making the reverse feel disconnected.
Pair batting with the quilting style
Batting changes loft, stitch definition, drape, warmth, and seam visibility. An 80/20 cotton and polyester blend is often chosen when the maker wants a balance of natural fiber feel and clear quilting texture. Hobbs and Pellon both offer batting options suited to different finishing preferences, while The Warm Company is another familiar name in quilt finishing.
Consider the role of each layer:
- 80/20 batting: A useful balance for defined quilting and manageable loft.
- 100% cotton batting: Often selected for a flatter, traditional drape and natural fiber composition.
- Black batting: Can support very dark quilt designs and reduce the visual impact of tiny gaps in high-contrast tops.
- Fusible batting: Convenient for certain small projects, though the adhesive and pressing requirements must suit the fabric.
- Roll or by-the-yard batting: Helpful when the project dimensions don't fit a precut package.
A dense quilt design may need a batting with stable stitch response, while a soft table runner may benefit from less loft and less bulk. Check fiber content, loft, and quilting-distance guidance before layering.
For backing calculations and construction considerations, consult this resource on quilt backing fabric. The best result comes from treating the top, backing, batting, and thread as one system.
Leveraging Ready-to-Sew Kits for Speed
Buying every component separately gives you maximum control, but it also creates several opportunities for error. You can misread a directional print, underestimate binding, choose reds with different undertones, or discover that the selected background is too light to separate the stars.
Ready-to-sew kits solve a different problem. They bundle coordinated fabric and often include measured pieces, pattern instructions, batting, or other project components. For a busy maker, the value isn't just convenience. It's the reduction of decisions between opening the package and making the first seam.
Kits reduce preparation risk
I've used coordinated bundles when I wanted the sewing itself to be the project, not a second shopping trip. A thoughtfully assembled kit can make a beginner feel capable quickly while giving an experienced quilter a dependable starting point for a seasonal runner or gift.
Look for these features:
- Clear pattern instructions: Beginners need defined cutting directions and seam allowance guidance.
- Coordinated colorways: Ruby Star Society collections and Kona Cotton solids can provide a modern, controlled palette.
- Precut components: Strips, squares, or other precuts reduce repetitive cutting and help preserve fabric.
- Complete top requirements: Verify whether the package includes only the quilt top or also backing and batting.
- Consistent labeling: Separate pieces by role so background, accent, border, and binding fabrics don't get confused.
A kit doesn't remove the need to check grain, press seams carefully, or test colorfastness. It moves much of the sourcing and calculation work upstream.
Choose the right level of complexity
A simple table runner can be an approachable first project, particularly when the pieces are labeled and the pattern uses familiar units. More advanced makers may prefer pixel quilt kits or carefully arranged half-square triangle projects where fabric placement matters more than speed.
The distinction between a fat quarter and yardage also matters. A fat quarter is a quarter-yard cut across the width of fabric, making it useful for varied small pieces but less efficient for long borders or backing. For a fuller discussion of coordinated options, explore these patriotic quilt kits before committing to a multi-project fabric pull.
Exploring Historical Design Motifs
Patriotic fabric doesn't have to reproduce one modern flag arrangement. Its design vocabulary comes from changing laws, regional flag making, military history, and textile practice.
The first national flag law, adopted by the Continental Congress on June 14, 1777, specified 13 alternating red-and-white stripes and 13 white stars on a blue field. The stars represented a “new constellation,” while the stripes and stars represented the original colonies. The law didn't prescribe the stars' arrangement, exact proportions, stripe width, or fabric type, so early flags and later fabric interpretations could vary.
Let history guide the print
The Library of Congress records 27 official U.S. flag versions, and star arrangements remained variable among flag makers until 1912, when President William Howard Taft standardized the 48-star flag into six rows of eight. That history gives quilters room to choose a circular 13-star layout, rows of stars, or a scattered contemporary print without assuming only one design can be historically meaningful. The historical overview is documented by the U.S. Department of State's flag history.
The Star-Spangled Banner offers an even more tactile lesson. The 1814 flag used 15 stars and 15 stripes, reflecting Vermont and Kentucky joining the Union. The Third Flag Act of 1818 restored 13 stripes and required one star for each state.
Notice the materials and scale
Smithsonian records describe the banner's red and white stripes as wool bunting, with a wool blue canton and cotton stars. Mary Pickersgill assembled it by overlapping and stitching eight strips of red wool with seven strips of undyed white wool. Because the bunting came in widths of about 18 inches while the intended stripes were approximately 2 feet wide, the construction required splicing. The stars were nearly 2 feet across. These details appear in the Smithsonian Star-Spangled Banner documentation.
That construction history supports modern choices such as strip sets, appliqué stars, large-scale motifs, and pieced backing. A historically inspired quilt can be accurate in spirit while still using contemporary cotton yardage and modern cutting methods.
Comparing Shopping Channels for Makers
The best shopping channel depends on what you need to verify. A nearby big-box store may be convenient when you need a small cut immediately, while a local quilt shop may let you handle the cloth and ask about pressing or shrinkage. An online specialty retailer usually offers the broadest searchable selection and more consistent product information.
Compare the trade-offs
| Shopping channel | Strength | Limitation |
|---|---|---|
| Big-box retailer | Immediate access and simple browsing | Selection and technical details may be limited |
| Online specialty shop | Broad collections, brands, and searchable specifications | You can't handle the fabric before ordering |
| Local quilt store | Personal advice, physical samples, and community knowledge | Inventory and price may vary |
Specialty quilting stores can make it easier to compare P&B Textiles, Marcus Fabrics, Blank Quilting, Kona Cotton, and Ruby Star Society within one project. They're also more likely to identify whether a fabric is intended for quilting, apparel, décor, or a wideback application.
Online buying still requires discipline. Read the listed width, fiber content, repeat, care notes, and cut policy. Look for product photographs that show enough fabric to judge scale, and contact customer support when a directional print or panel measurement isn't clear.
A local shop remains valuable for color matching. Take a swatch of your existing navy or background fabric rather than relying on memory. Online, save product names and collection details so you can reorder the same colorway when the project expands.
Calculating Yardage to Minimize Waste
Buying extra fabric feels safe, but it isn't always efficient. The 2025 Quilter's Trends Survey reports that inflation is encouraging quilters to use their existing stash, while the average quilter starts 11 projects and finishes 9 annually. The same survey reports that 18% of respondents identified as new quilters in 2025, up from 11% the prior year. These findings are summarized in this 2025 quilting trends survey report.
Calculate from the finished project backward
Start with the finished dimensions, then add the components that consume fabric:
- List every unit: Blocks, borders, cornerstones, binding, appliqué, and backing.
- Record cut dimensions: Include seam allowances in each cut size.
- Group identical cuts: Count how many squares, strips, or rectangles the project needs.
- Check directional placement: Allow extra fabric when stars, stripes, lettering, or panels must face one way.
- Reserve for pattern matching: Add room for repeats at borders and prominent seams.
- Plan the binding separately: Binding strips often require more continuous yardage than expected.
- Use the actual usable width: Remove selvages from your calculation and compare the result with the fabric width.
For a table runner, a carefully arranged half-yard or fat-quarter pull may be enough, while a lap or full-size quilt requires a separate top, border, backing, and binding plan. A directional print may need more yardage than a similar non-directional print even when the finished dimensions are identical.
The practical goal isn't to buy the smallest possible amount. It's to buy enough for the layout you will sew, while assigning likely leftovers to bindings, appliqué, small seasonal projects, or scrappy blocks. Use this fabric yardage calculation guide alongside a paper cutting plan before ordering.
People Also Ask
What fabric is best for patriotic quilts
100% quilting cotton is a dependable choice because it offers a stable weave, predictable handling, and a suitable balance of sewability and durability. Check the finished width, weight, care instructions, and colorfastness rather than choosing only by motif.
Should I prewash patriotic fabric
Prewashing dark red and navy fabric separately is a sensible precaution, especially when the finished project will be washed. It can reveal loose dye and reduce differential shrinkage before you cut the blocks.
How do I stop red fabric from bleeding into white
Test a sample first, wash saturated colors separately, use a color catcher for the first finished-quilt wash, and avoid chlorine bleach unless the manufacturer permits it. Persistent bleeding is a reason to replace or repurpose the fabric.
How much patriotic fabric should I buy
Calculate the top, borders, binding, backing, directional layout, and repeat matching separately. Buy enough to support the actual cutting plan, then assign leftovers to small pieces instead of automatically ordering a large bundle.
Are ready-to-sew kits good for beginners
They can be an effective starting point because coordinated fabrics, precuts, and pattern instructions reduce sourcing and calculation decisions. Beginners should still confirm the seam allowance, included components, and finished project dimensions.
QuiltKit.com brings together coordinated patriotic quilt kits, premium yardage, wideback cottons, and batting from brands including Kona Cotton, Ruby Star Society, Hobbs, and Pellon. Browse the curated selection at quiltkit.com, and join the Email Sign-up Savings list if you want practical project ideas and offers before your next fabric purchase.