


Quilt Fabric Charm Packs: A Practical Guide
You've got a fresh stack of colorful squares on the cutting table, but the pattern in front of you seems to assume you already know how much fabric will remain after sewing. The package says 5 inches, the quilt block says something smaller, and suddenly a simple charm-pack project feels like a measuring exercise.
Quilt fabric charm packs make patchwork approachable because the first cutting stage is largely finished. The part that still requires care is planning. Once you account for seam allowances, layout, borders, duplicates, directional prints, and background fabric, you can choose the right number of packs with much more confidence.
What a Quilt Fabric Charm Pack Is
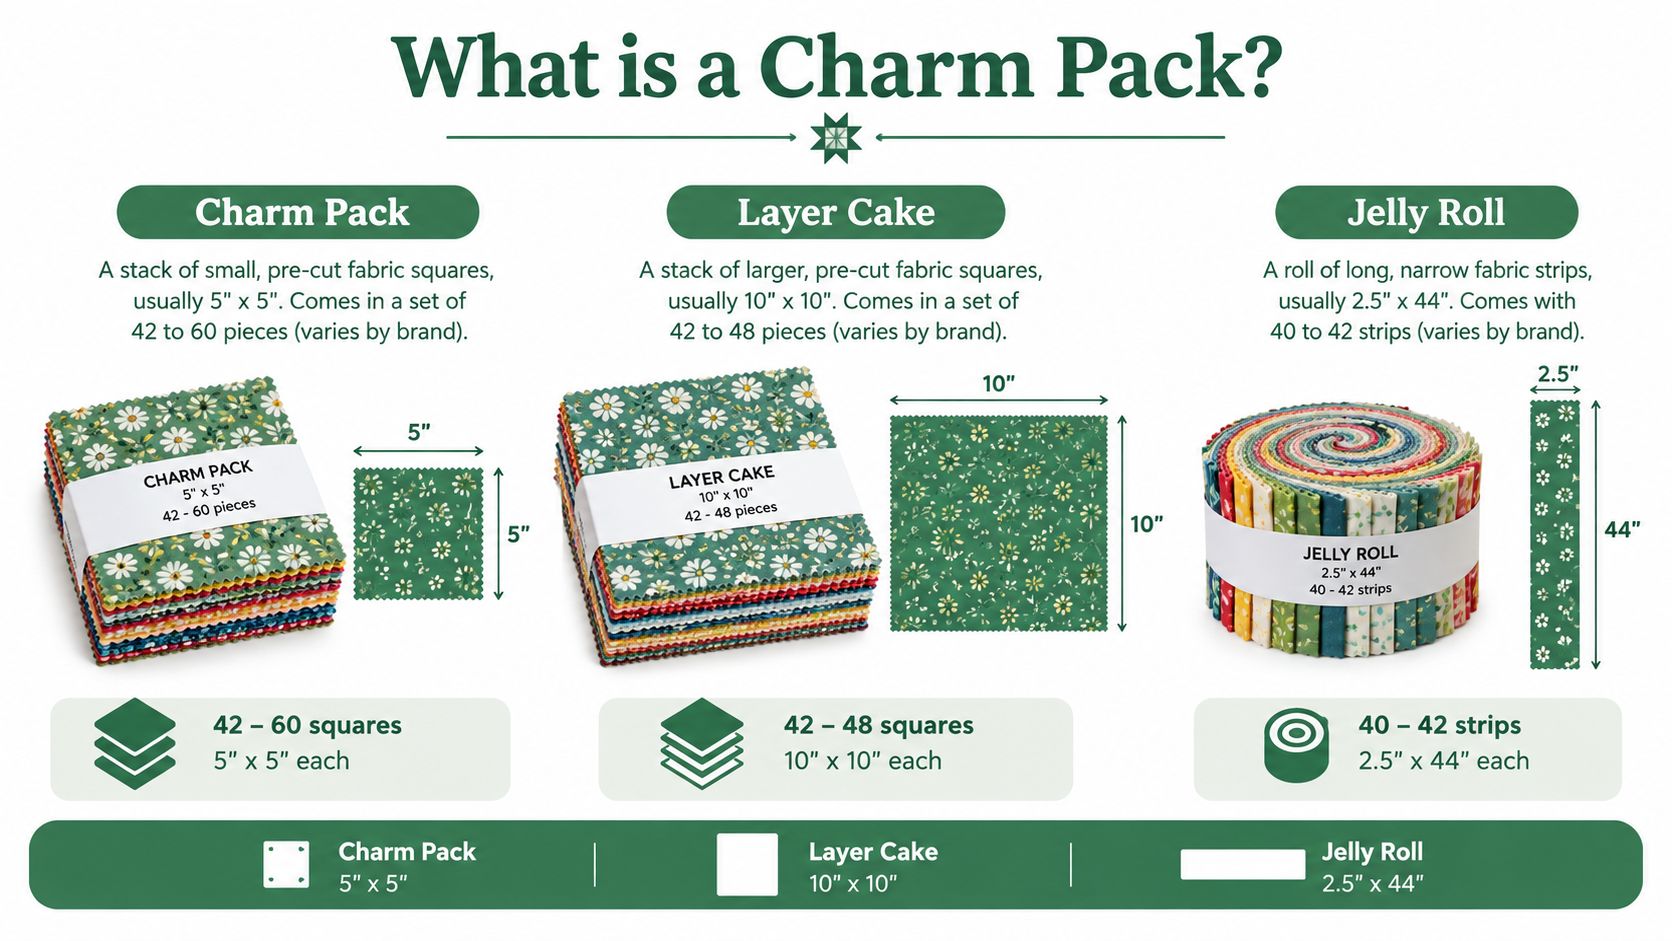
At the cutting table, a charm pack looks like a small stack of ready-to-sew squares. The fabric is already cut, the prints belong to one collection, and the colors have been selected to work together. A quilt fabric charm pack usually contains 42 squares measuring 5 inches by 5 inches before sewing. This guide to precut fabric squares helps compare charm packs with other precut formats.
That convenience changes the first question you ask. Instead of beginning with yardage and a rotary cutter, begin by examining what the pack can do. Spread out the squares, separate light and dark values, and check whether the collection includes repeated prints, directional designs, or mostly one color family. The pack supplies coordination, while your layout determines the character of the finished quilt.
The name comes from the older tradition of charm quilts. In historical charm quilts, particularly those made in the nineteenth century, makers tried to use each fabric only once. Clothing, scraps, and exchanged textiles supplied the variety, so the quilt also preserved small pieces of available fabric. Modern manufacturers adapted that idea into coordinated retail collections during the early 2000s. Quilting educators widely credit Moda Fabrics with popularizing the term “charm pack” among modern makers. A quilting reference on charm-square projects explains the shift from individually exchanged squares to a standardized precut format.
The measurements that matter
A square begins at 5 inches by 5 inches, or 25 square inches of unsewn fabric. A pack of 42 squares therefore contains 1,050 square inches before seams, trimming, layout gaps, or waste. These figures follow the standard precut specification used by major manufacturers. For project planning, treat the package measurement as the starting size, not the size of the visible patch after sewing.
A conventional 1/4-inch seam allowance removes fabric along each sewn edge. Sew all four sides as part of a pieced unit, and the finished square is approximately 4.5 inches by 4.5 inches. That half-inch difference can change the number of rows and columns a quilt needs. A pattern may call for five-inch squares because that is the cut size, while its finished layout relies on the smaller sewn measurement.
Some manufacturers package approximately 40 pieces, and similar precuts may use different names. Check the square dimensions and the count on the label before buying fabric or following a pattern. Two packs that look alike on the shelf may produce different totals.
How charm packs compare with other precuts
- Charm packs contain small squares, usually 5 inches before sewing, for patchwork, sampling, small gifts, and scrap-style quilts.
- Mini charm packs use smaller squares, commonly 2.5 inches, creating more seams and smaller visual units.
- Layer cakes use larger squares, commonly 10 inches, for larger blocks with fewer seams.
- Jelly rolls are narrow strips, commonly 2.5 inches wide and cut across the usable fabric width, so they behave differently from square precuts.
A charm pack works like a small color library. Use it to test value, placement, pressing, and piecing without cutting an entire collection from yardage. Before the rotary cutter comes out, decide whether the project needs variety, repetition, or a controlled arrangement. That choice will guide the background fabric, borders, and later supply decisions.
Sizing, Seam Allowance, and Layout Math
A charm pack becomes easier to plan once you separate the number printed on the package from the size of the sewn patchwork. A standard 5-inch charm square is cut at 5 inches, but a typical 1/4-inch seam allowance removes 1/2 inch from the total width and height. The finished unit is therefore approximately 4.5 inches square.
A standard pack of 42 squares contains about 851 square inches of finished patchwork before borders, sashing, trimming, or waste. That figure helps you judge whether the pack suits a compact quilt top, but the pattern's construction method still determines the finished dimensions. The finished-area calculation and precut comparison are outlined here.
Start with the finished unit
For a simple grid, multiply the number of finished squares across by 4.5 inches, then multiply the number of rows by the same measurement. A 6 by 7 grid using all 42 squares would finish at approximately 27 inches by 31.5 inches before borders. The production-planning method and nominal layout are detailed here. For more ideas built around this cut size, see these quilt patterns using 5-inch squares.
An 8 by 10 grid needs 80 finished squares, so one standard pack cannot supply it. This is a common planning mistake. Count the sewn units required by the pattern, not only the cut squares listed on the package.
Sashing changes the calculation. If the design uses a 2-inch finished sashing strip, calculate those strips separately from the charm-square area. A grid with seven columns, for example, has six vertical sashing spaces between them. Cornerstones add more pieces and require their own fabric estimate. Borders enlarge the quilt, but their yardage should be calculated separately rather than treated as extra charm-pack coverage.
Allow for real-world variation
Reserve squares when the design requires matching pairs, directional placement, fussy cutting, or half-square triangles. A half-square triangle starts with a charm square, yet the sewn and trimmed unit is smaller than that starting piece. Trimming also creates waste, so a layout that uses every square in theory may need more than one pack in practice.
Make one representative unit before sewing the full batch. Keep the seam allowance consistent, press it as the pattern directs, and measure the result. If it finishes smaller or larger than expected, adjust before cutting background pieces or committing to the full layout.
A practical planning sequence is:
- Count the squares and confirm their nominal dimensions.
- Sort prints by light, medium, and dark value.
- Test-sew one unit with a consistent 1/4-inch seam.
- Measure the finished unit against the pattern.
- Add coordinating solid fabric for sashing, borders, or background.
- Add batting, backing, and binding to the same shopping list.
- Buy extra packs if the design depends on matched placement or a precise assortment.
Practical rule: Plan from the post-seam measurement, not the number printed on the package.
Use the chart below as a starting point. Manufacturer counts, block construction, and backing layouts vary, so the pattern's cutting list remains the final reference.
| Quilt Type | Packs Needed | Finished Top Size | Backing Yardage |
|---|---|---|---|
| Compact patchwork top | One standard pack may be suitable | Calculate from the finished 4.5-inch units | Follow the pattern's backing requirement |
| Baby quilt | One or more packs, depending on layout | Add background fabric and borders as specified | Measure the completed top before ordering |
| Throw quilt | Multiple packs are commonly required | Confirm the grid, sashing, and border dimensions | Choose yardage or a wide-back after sizing |
| Generous bed-size quilt | Several packs may be required | Use the pattern's finished dimensions and reserve | Calculate for overhang, quilting, and seam placement |
Quick Projects You Can Finish in a Weekend
A charm pack works well when you want a finished object without committing to a complex block library. The easiest projects use the squares as they are, while more involved designs turn them into half-square triangles, flying geese, or disappearing nine-patch units.
A table runner with a small, lively layout
A runner using 12 to 16 squares can be a satisfying first project. Setting the squares on point creates movement, but it also introduces bias edges, so handle the cut triangles gently and avoid pulling them while sewing.
The straightforward version is to arrange the squares, add the setting triangles required by the pattern, sew the rows, press carefully, then add borders if the design calls for them. A runner is also a good place to try a seasonal collection or a collegiate color palette before investing in a larger quilt.
A postage-style patchwork top
A single standard pack can provide a compact postage-style top when the design uses straight seams and keeps the squares whole. Lay out all the pieces before sewing, especially if the collection contains repeated prints. You may prefer a balanced scatter, a light-to-dark progression, or a deliberately scrappy arrangement.
A simple project schedule can be divided into manageable sessions:
- Preparation: Press, sort, and plan the layout.
- Piecing: Chain-piece rows or pairs, then join the larger units.
- Finishing: Add batting, backing, quilting, binding, and a label.
The actual time depends on the pattern, your equipment, and your experience. Pre-basted quilt kits can remove some preparation, while a quilts-in-a-day format may keep the project focused on one straightforward construction method.
A compact baby quilt
A baby quilt can combine one charm pack with coordinating background fabric. The finished size depends on the selected layout, so calculate it from the sewn units rather than assuming the package count creates a particular dimension.
For gifting, choose prints with clear contrast and avoid placing every busy print next to another busy print. A quiet solid can give the eye a resting place. Kona Cotton Solids are a familiar option for that role, while Ruby Star Society collections can bring a modern, graphic character when the prints need a stronger contemporary feel.
An intermediate choice is the disappearing nine-patch. You begin with a nine-patch block, make planned cuts, and rotate the resulting sections to create a secondary pattern. It's more involved than straight patchwork, but the original block structure gives you a useful way to understand how cuts and rotation change a quilt's appearance.
The project format matters as much as the fabric. A runner suits a host gift, a compact patchwork top works for a wall or small household quilt, and a baby quilt offers a practical handmade present. These quick quilt pattern ideas can help you match the construction method to the time you have available.
Cutting and Piecing Tips From Real Packs
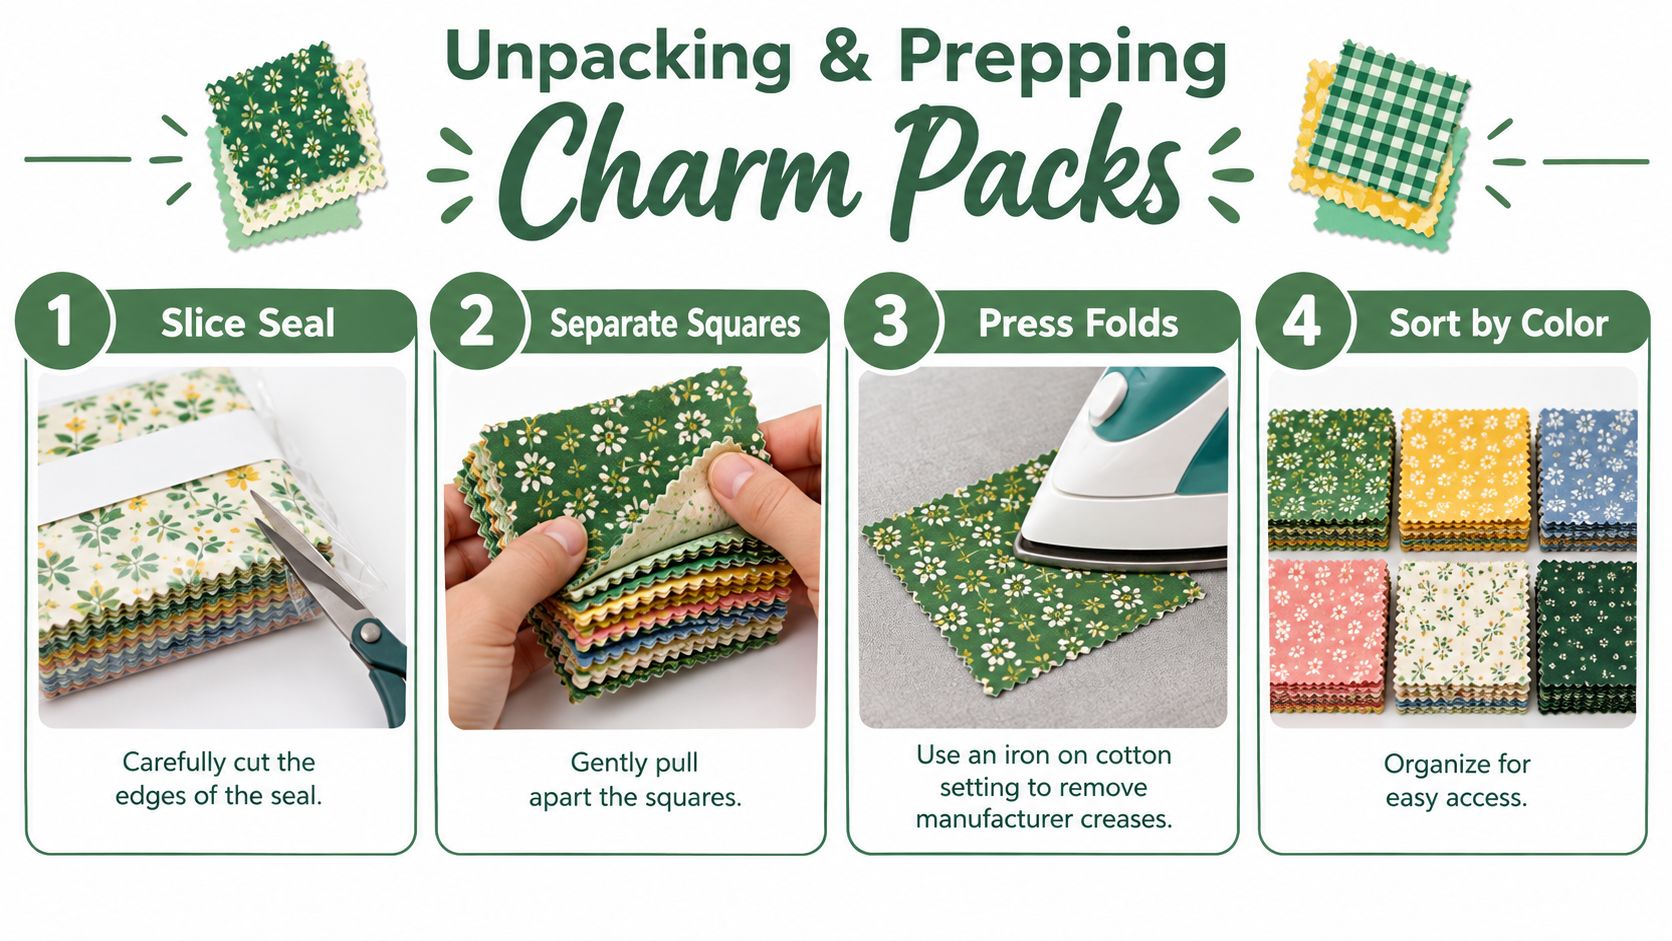
A charm pack can look ready to sew, yet the first few minutes at the cutting table often determine whether the finished top behaves. Count the squares, confirm the nominal 5 by 5-inch size, and inspect the pack for duplicates, pinked edges, fold creases, or directional motifs. Those details affect how you sort, orient, and plan the layout.
Treat the pack count as an inventory, not a guaranteed quilt size. A pattern may require a particular balance of light and dark fabrics, while a bundle may contain repeated prints or an uneven mix of values. Moda's published four-pack example uses 160 five-inch squares and assumes an equal light and dark balance. That example makes the planning step clear: count first, then decide how many sewn units the pack can supply.
A 5 by 5-inch square sewn with a 1/4-inch seam on both sides finishes at 4 1/2 inches within the block. The seam allowance is fabric that disappears into the stitching, so calculate the finished layout from sewn units rather than from the cut dimensions. Make a small test before committing to the complete arrangement.
Sort for contrast, not just color
Spread the squares on a design wall, clean floor, or large table. Sort by value, meaning how light or dark each fabric appears, rather than by color alone. A green print may read as light, medium, or dark depending on its background and the fabrics beside it.
- Lights: Pale backgrounds and low-contrast prints open up the arrangement.
- Mediums: These connect the light and dark groups and keep the layout varied.
- Darks: Strong contrast defines blocks, seams, and repeated motifs.
- Directional prints: Trees, script, roosters, and similar designs need consistent orientation if you want them to face the same way.
Press fold creases with the cotton setting appropriate for the fabric. Steam is fine, but guide each square without stretching it, especially if an edge is slightly off-grain.
Make a test unit
A small test block protects the rest of the pack. If your pattern calls for 2.5-inch squares, chain-piece six into one test unit, press it, and measure the sewn result against the required dimensions. A practical charm-pack workflow emphasizes testing seams, sorting values, and checking the sewn result rather than trusting the cut measurement alone.
Use a consistent 1/4-inch foot. If the seam line wanders, place three layers of tape on the throat plate as a visual guide, then test with the actual fabric and thread. Correcting the seam now is easier than unpicking a full quilt top.
Chain-piecing saves handling time, but a long string of units can become confusing. Label sewn stacks with painter's tape and notes such as “row one, left” or “dark corners.” Press seams consistently, and nest opposing seams at intersections so points meet more neatly and blocks lie flatter.
For more help with accurate units, use this guide to squaring up quilt blocks. Correct a slightly uneven block early, before that small difference spreads across several joined rows.
Project Ideas by Skill Level
Skill level should guide your construction choice, not limit your creativity. A first-time maker can work with a simple grid, while a returning quilter may enjoy adding triangles, secondary patterns, or multiple precut formats.
Beginner-friendly choices
A simple patchwork runner, compact baby quilt, or pillow cover lets you practice cutting, a consistent quarter-inch seam, pressing, and binding without asking every seam to meet a complicated point. Choose a design with straight seams if you're still learning how fabric behaves.
For a first project, the most useful tools are:
- Rotary cutter and ruler: Keep the cut edges square and consistent.
- Quarter-inch presser foot: Use it for repeatable seam width.
- Design surface: Arrange the squares before sewing.
- Iron and pressing surface: Set seams without stretching the fabric.
- Walking foot: Useful when quilting the assembled layers.
A coin-style baby quilt can introduce a background fabric and vertical movement, but it also asks you to keep the strips aligned. A patchwork pillow cover is smaller and lets you learn how to finish an opening cleanly before working on a full quilt.
Intermediate choices
A disappearing nine-patch introduces more cutting after the initial block is assembled. A sampler can combine charm squares with mini charms and sashing, while a sawtooth-star layout asks for accurate points and careful trimming.
| Project | Skill Level | Packs Needed | Time to Finish | Watch Out For |
|---|---|---|---|---|
| Patchwork table runner | Beginner | Pattern-dependent | Short project | Bias edges when set on point |
| Coin-style baby quilt | Beginner | Pack plus background fabric | Manageable weekend project | Keeping strips aligned |
| Patchwork pillow cover | Beginner | A small selection of squares | Quick finish | Accurate closure and quilting |
| Disappearing nine-patch throw | Intermediate | Pattern-dependent | Longer weekend project | Matching cuts and rotations |
| Charm and mini-charm sampler | Intermediate | Multiple precut formats may be needed | Extended project | Sashing and unit compatibility |
| Sawtooth-star layout | Intermediate | Charm pack plus additional border fabric | Extended project | Mismatched points and binding needs |
Pick by available time rather than ambition. If you have under six hours, choose a small runner or pillow project. If you have six to twelve hours, a simple patchwork top may fit. For a full weekend, consider a disappearing nine-patch or a more involved sampler, but reserve time for pressing, trimming, and correcting seams.
The most commonly forgotten supply is binding fabric. Add it to the plan before you buy the charm pack, especially when the pattern uses a strong contrast fabric for the edge.
Buying Charm Packs and Matching Supplies
Buying the pack is only the beginning. A smooth project also needs background fabric, binding, batting, backing, thread, and a pattern whose cutting instructions match the pack dimensions.
One extra pack is often a sensible planning choice when the design depends on a balanced assortment. The additional squares can replace a damaged or undersized piece, supply a directional-print candidate, give you more freedom during layout, or become part of the quilt label. That doesn't mean every pattern requires an extra pack, but it does give you room to make decisions after you see the fabric in person.
Moda, Riley Blake, Marcus Fabrics, and Tilda appear across many quilting collections, but their visual languages differ. Moda is widely associated with designer lines, Marcus Fabrics is often chosen for reproduction-style prints, and Tilda is known for softly coordinated, pastel-leaning collections. Check the actual product information rather than assuming that every brand uses the same pack count or cut dimensions.
Match the supporting fabrics
A coordinating solid should relate to the background tone of the collection, not just repeat its brightest color. Kona Cotton Solids and Bella Solids can both work as backgrounds, but place a swatch beside the charm squares before deciding. A warm cream may support a vintage collection better than a stark white, while a deep solid can sharpen modern prints.
Batting changes the hand and stitch-definition of the finished quilt. An 80/20 cotton batting is a practical option when you want a soft drape with some loft, but the pattern, quilting method, and intended use still matter. QuiltKit's selection includes batting from brands such as Hobbs Bonded Fibers, Pellon, and The Warm Company, with options that include cotton, 80/20 blends, fusible formats, black batting, and roll-by-the-yard choices.
A wide-back fabric can avoid a pieced backing seam, particularly when the finished top is larger than ordinary quilting-width fabric. Before ordering, compare the completed top dimensions with the backing width and allow room for quilting and trimming.
Shopping habit: Keep the charm pack, background, batting, backing, binding, and thread decisions together. A coordinated order is easier to check than a collection of disconnected purchases.
Use this guide to fabric bundles for quilting when you're comparing coordinated collections and supporting yardage. Before checkout, confirm the pack's prewash information, check the manufacturer's dye-lot details when available, and make sure the thread color suits both the prints and the background.
People Also Ask
Are all quilt fabric charm packs the same size?
No. The most widely recognized format contains 42 squares measuring 5 inches by 5 inches, but some manufacturers use approximately 40 pieces or different naming conventions. Check the product specifications before cutting.
How big does a charm square become after sewing?
With a conventional 1/4-inch seam allowance sewn on all four sides, a 5-inch square finishes at approximately 4.5 inches by 4.5 inches. Measure a test unit before making the full batch.
Should I buy an extra charm pack?
An extra pack can help when a pattern needs matched pairs, directional placement, controlled color balance, or replacement pieces. It isn't automatically required, so compare the pattern's cutting list with the pack's actual count.
What can I make with a charm pack?
Charm packs suit patchwork tops, table runners, baby quilts, pillow projects, half-square triangles, disappearing nine-patch blocks, and other compact designs. The pattern's trimming and background requirements determine how far the pack will go.
How do I choose a coordinating solid?
Place candidate solids beside the charm squares and compare value, temperature, and contrast. A background that supports the collection's overall tone usually creates a clearer design than a solid chosen only because it matches one bright print.
QuiltKit offers precut fabrics, coordinated bundles, modern solids, batting, wide-back cottons, thread, and ready-to-sew project formats for makers planning charm-pack quilts. Visit quiltkit.com to choose the supporting fabric and finishing supplies for your next project, and join the Email Sign-up Savings list if you're still comparing options before buying.